Your complete resource for building engaging, branded web experiences
What are Templated Experiences?
Templated Experiences are PathFactory’s powerful page building tool that lets you create branded landing pages, content hubs, and interactive web experiences. With our streamlined approach, you can go from concept to live page in minutes.
Set your Theme → Build your Experience
Core Concepts
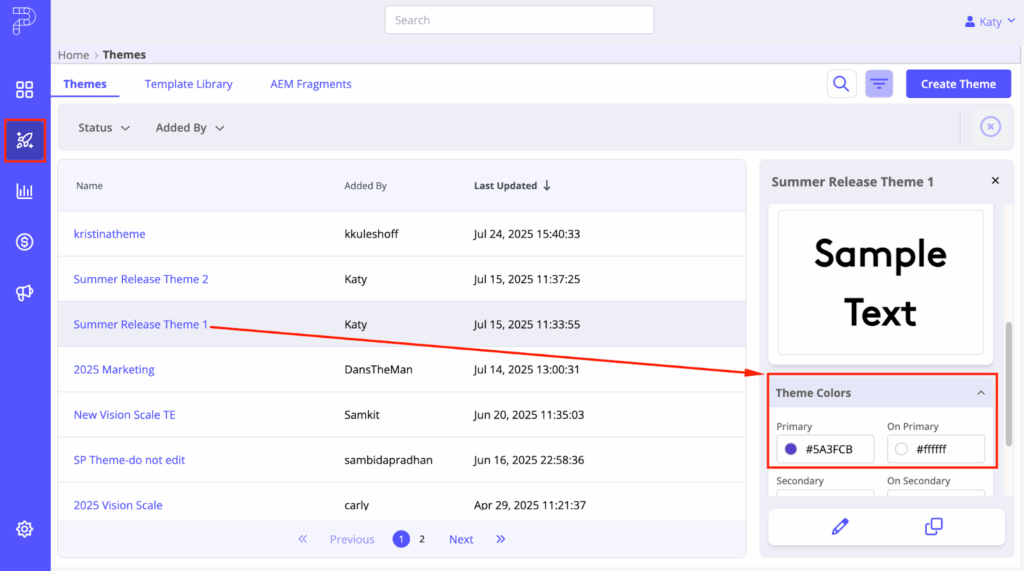
Themes: Your Brand Foundation
Themes define your brand guidelines and control:
- Typography: Fonts, headings, and text styles
- Colors: Primary, secondary, and accent colors
- Buttons: CTA styling, hover effects, and sizing
- Spacing: Margins, padding, and layout consistency
Think of Themes as: Your brand’s visual DNA that ensures consistency across all experiences.
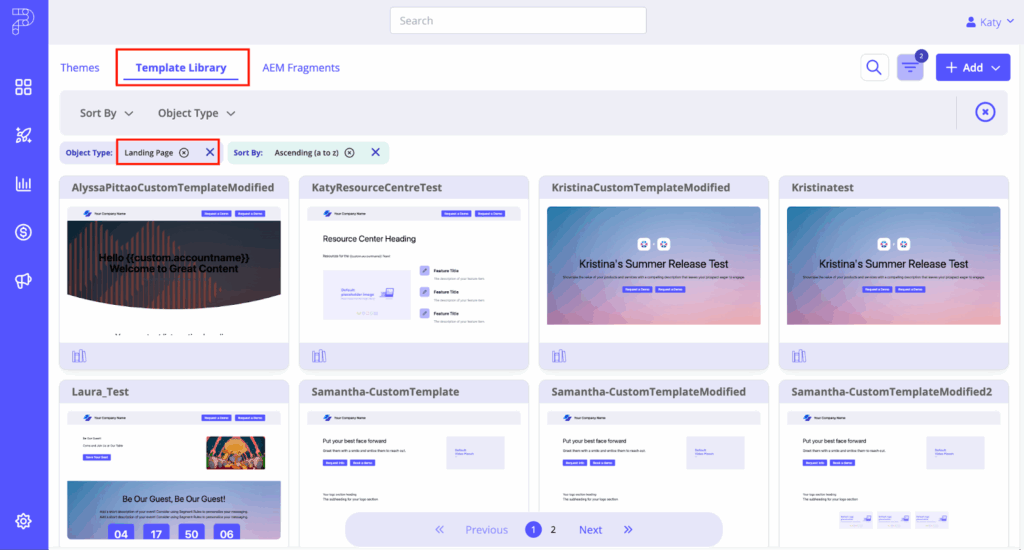
Template Library: Your Content Toolkit
The Template Library houses all your reusable design elements:
- Landing Page Templates: Complete page layouts ready to customize
- Content Page Templates: Layouts for content playlists- how buyers interact with content
- Sections: Individual page components (headers, forms, testimonials)
- Components: Smaller reusable elements (buttons, cards, lists)
Think of the Library as: Your team’s shared collection of proven designs.
Build Your Experience
Method 1: Build from Scratch
Best for: Unique campaigns, maximum creativity, one-off projects
What You Get:
- Complete design flexibility
- Add, remove, and rearrange sections freely
- Standalone Templated Experience (independent from templates)
- Perfect for custom layouts
The Process:
- Choose “Build from Scratch” when creating
- Select your Theme for branding
- Choose a Content Page Template to display your embedded assets
- Add sections one by one from the Template Library
- Customize everything to your needs
Results in: Standalone page with complete flexibility – shows “This page isn’t linked to a Template”

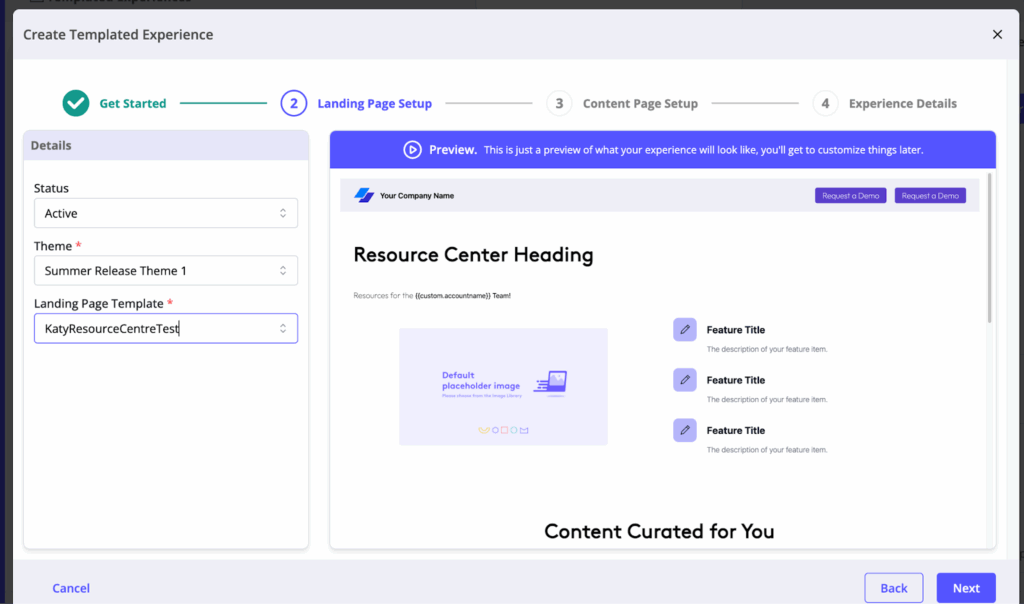
Method 2: Build from a Template
Best for: Brand consistency, proven layouts, quick deployment
What You Get:
- Connected to a master Template
- Automatic updates when Template changes
- Linked Templated Experience with template benefits
- Streamlined for fast creation
The Process:
- Choose “Build from a Template”
- Browse and select from available Templates
- Apply your Theme for brand consistency
- Customize content within the template structure
Results in: Linked page with template connection – shows “This page is linked to a Template in your Library”
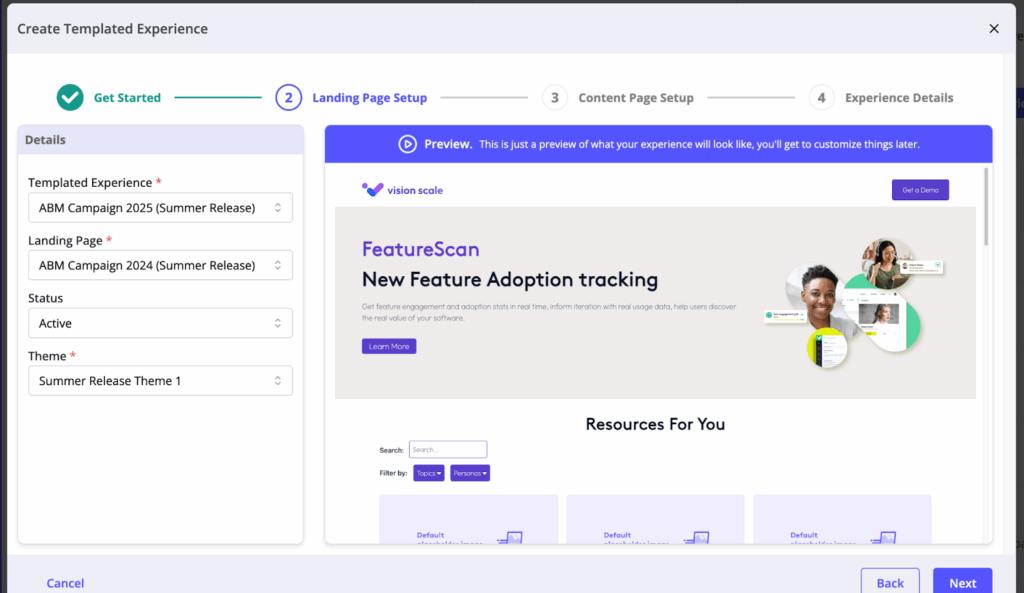
Method 3: Copy Existing Layout
Best for: Reusing successful designs, learning from proven campaigns
What You Get:
- Standalone page based on existing design
- No template connection
- Complete editing flexibility
- Quick way to replicate success
The Process:
- Choose “Copy an Existing Layout”
- Apply your Theme
- Select the experience and specific page to copy
- Modify the copied layout as needed
Results in: Standalone Templated Experience with copied design structure.
Page Editor (Pages Tab)
Editor Interface Layout
The Pages tab provides your main editing environment:
- Side Navigation: Tools and features organized in the left sidebar
- Central Canvas: Your page preview and editing area
- Right Panel: Section management and customization options
- Top Bar: Save, preview, and share controls, move between Landing & Content Pages, add Landing Pages
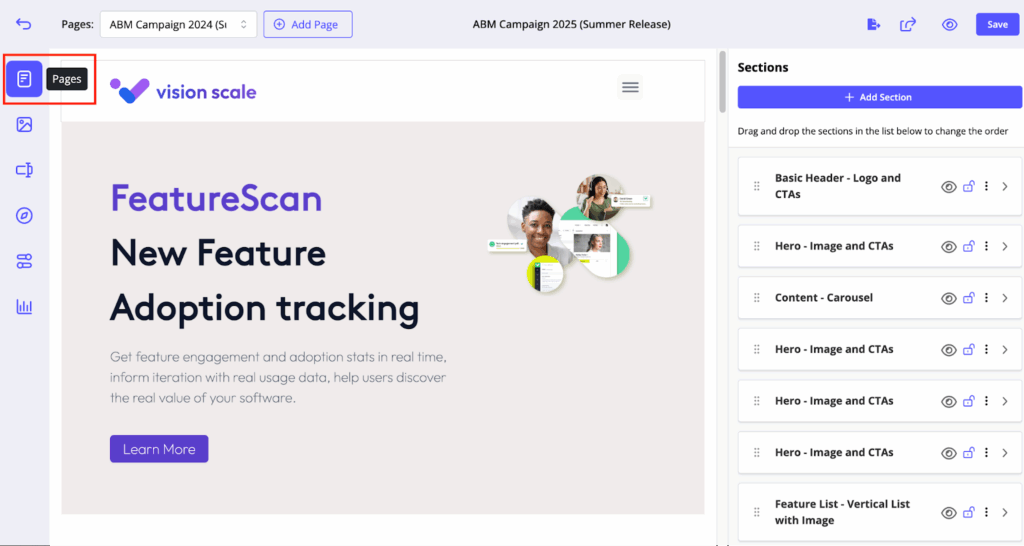
Adding Sections
Build your page by adding sections from the Template Library:
- Section Library Access: Click “+ Add Section” to browse available sections
- Section Categories: Sections are organized by type for easy browsing
- Drag and Drop: Reorder sections by dragging them up or down in the section list
- Section Preview: See how sections will look before adding them to your page
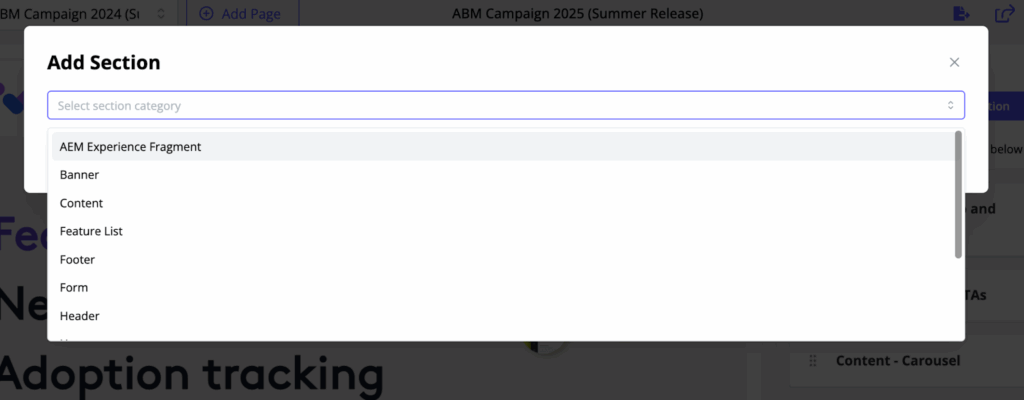
Section Types and Details
PathFactory provides over 20 pre-built sections to choose from.
Section Management
Once sections are added to your page:
- Edit Sections: Click any section to modify text, images, and settings
- Section Settings: Use the right panel to configure section-specific options
- Reorder Sections: Drag sections in the right panel to change their order
- Delete Sections: Remove unwanted sections using the section menu

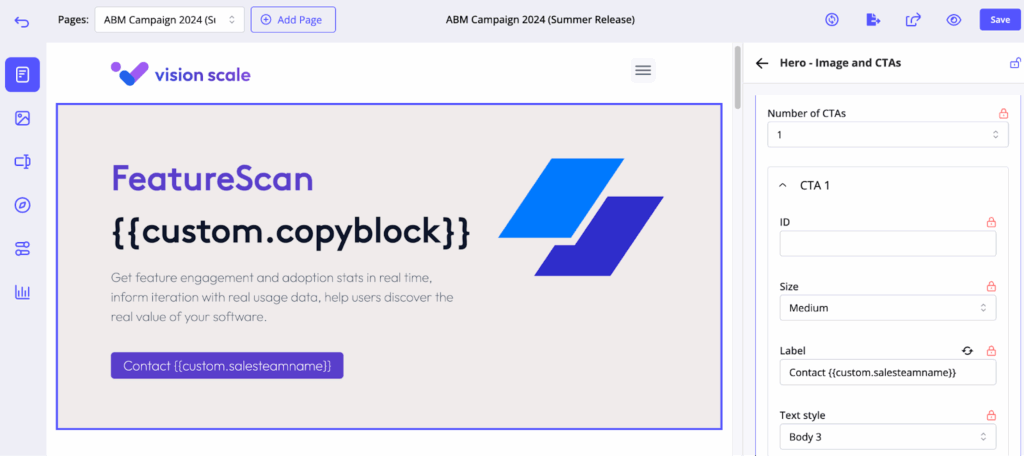
Landing Page Personalization
To personalize your landing page for different target audiences, use Segment Rules. For a complete guide to Dynamic Personalization in PathFactory, please refer to this article.
Adding Segment Rules
When configuring your page, replace any of the following with field merges to make your page dynamic:
- Copy- Industry messaging, prospect-specific pain points, tailored solutions
- Images- Account Team headshots, Industry-specific hero images, Account logos
- Videos – Personalized videos from reps to buyers, use case- specific webinars, background colours branded to your prospects
- CTA Labels – Call out individual sales reps in CTA labels (Get in touch with Joe!)
- CTA Destinations – Different Sales Team email address for correct routing (mailto:joe@company.com)
Content Configuration
Content Library: Your Marketing Assets
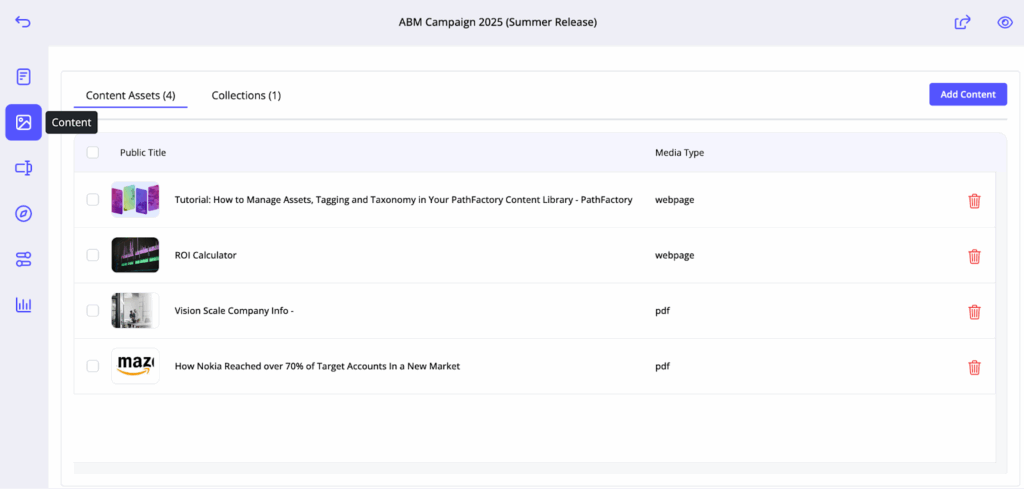
The Content Library houses your organization’s B2B marketing assets:
- Browse Assets: Find reports, ebooks, datasheets, webinar videos, and other marketing materials
- Direct Integration: Add marketing content without leaving the editor
- Consistent Distribution: Use approved assets across all experiences
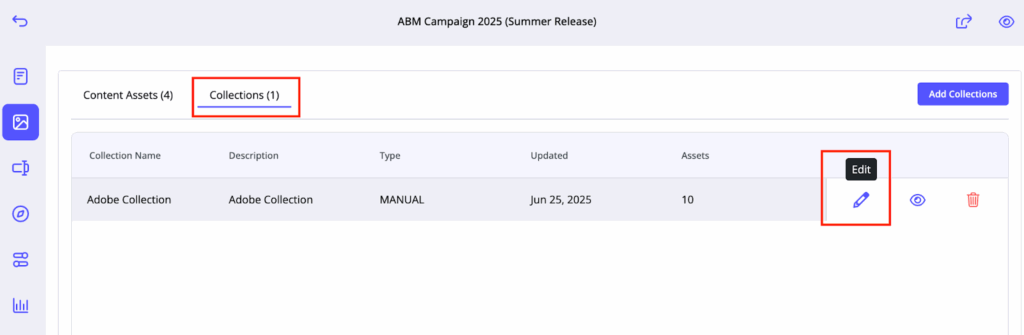
Collections for Dynamic Content
For a complete guide to PathFactory Collections, please refer to this article.
Add pre-defined Collections to create dynamic, personalized content experiences:
- Real-time Updates: Smart Collections automatically update as new marketing content is added
- Multiple Collections for Multiple Audiences: Collections can be mapped to Segments for even more personalization.
Powered By AI: Collection Sorting
Use AI to enhance content relevance for each visitor:
- Intelligent Sorting: AI analyzes visitor data to present most relevant marketing assets first
- Behavioral Adaptation: Asset ordering adapts based on engagement patterns
- Personalized Experience: Each visitor sees marketing content tailored to their interests
- Click “Edit” to view and sort your Collection’s content:
- Choose “Powered By AI” in your Sort Settings, then use the menu to go back to your Page Editor

Forms
For a complete guide to PathFactory Forms, please refer to this article.
Form Setup
Choose from pre-configured forms in your Form Library:
- Standard Forms: PathFactory native forms for basic lead capture
- MAP Forms: Marketing Automation Platform forms (recommended best practice)
Customize behaviour:
- Form Header Customization: Customize the form header & description text for your specific experience
- Experience & Content Rules: Choose the audience & behaviour that will trigger your forms
- Thank You Page: Override the standard post-submission experience
Lead Management
- Best Practice: Use MAP forms from your Form Library for automatic lead routing to your marketing automation system
- No Setup Required: Simply choose your desired form – the lead flow is already configured

Navigation
Creating Multi-Page Experiences
Transform your landing page into a complete microsite using our out of the box Header Section
- Additional Landing Pages: Add multiple pages within the same experience
- External Links: Include links to external resources in navigation
- Anchor Links: Use the Section ID from the General Settings in each section to create anchor links to different parts of your page
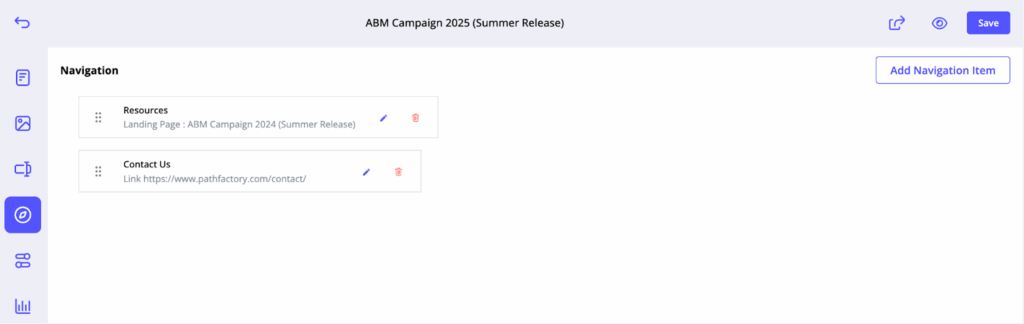
Navigation Management
- Header Section Control: Configure navigation directly in the header section
- Link Management: Add, remove, and organize navigation items
- User Journey: Create guided experiences across multiple pages
Experience Details
The Details page controls how your experience appears to visitors and search engines, as well as key settings.
Experience Details
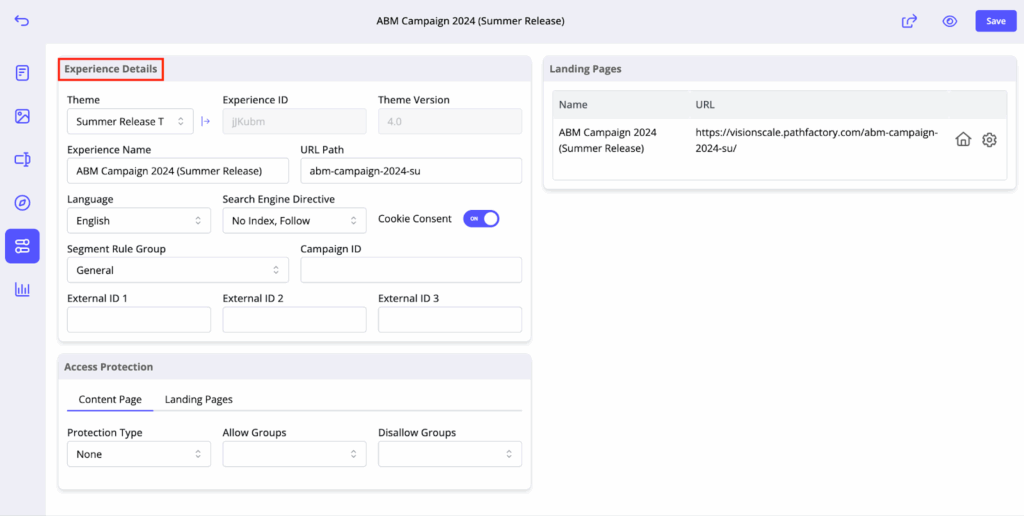
Control the technical aspects of your experience:
- Theme: Switch or view the Theme
- Experience Name: Internal name of the Templated Experience
- URL Path: The main URL path of the Templated Experience. If you have more than one landing page, each landing page will also have its own slug.
- Language: The selected Language of the Templated Experience- controls the translation of PathFactory labels such as content tags & filter names.
- Segment Rule Group: The group of Segment Rules referenced to control personalization on the page.
- Search Engine Directive: Determines crawler access to the Templated Experience, a default is set in your Organization Settings.
- Access Protection: Determines email verification for access to view the Templated Experience. For more information, please refer to this article
Landing Pages
Contains the full list of landing pages nested within the Templated Experience. Templated Experiences can contain multiple landing pages to create a microsite.
One of the pages is the Home Page, which can be accessed directly from the URL Path of the Templated Experience. You’ll also see a gear wheel for each landing page with various actions.
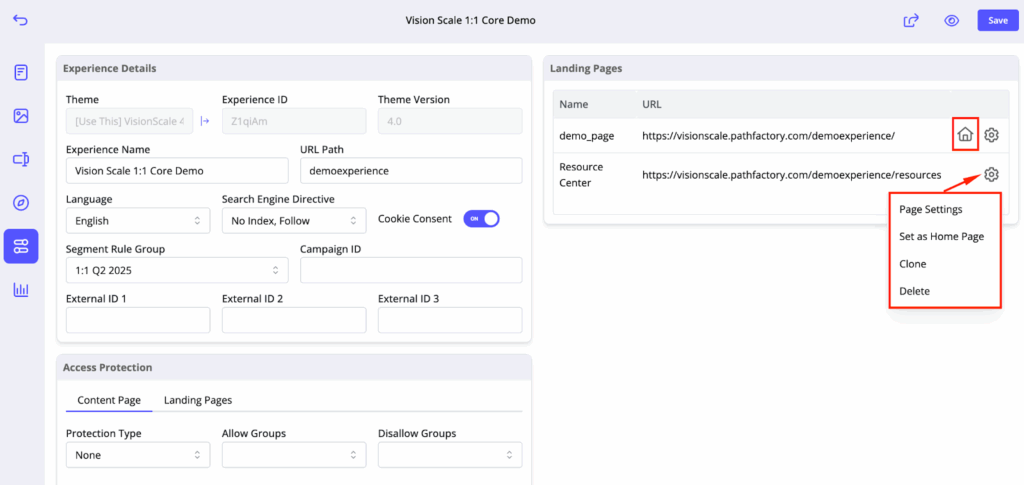
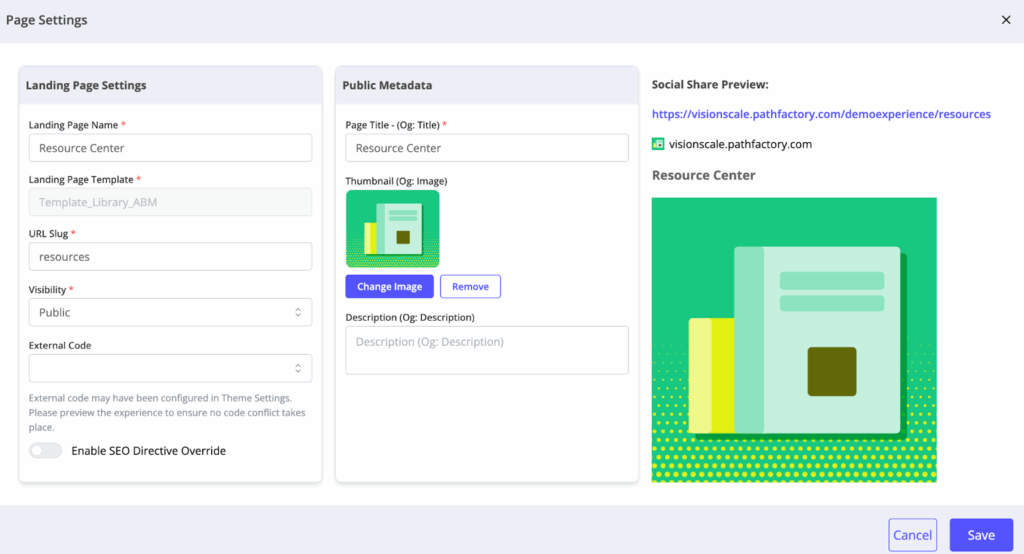
Page Settings
Page settings allows you to add a thumbnail, set metadata, and see a link preview:
Analytics and Performance
Engagement Data
Track how visitors interact with your Templated Experience:

To learn more about reports for Templated Experience performance, read Creating, Sharing & Analyzing Reports for Templated Experiences.
Advanced Features
Converting to Standalone Page
Use “Convert to Standalone Page” to break a template connection and unlock full editing (adding sections, rearranging sections)
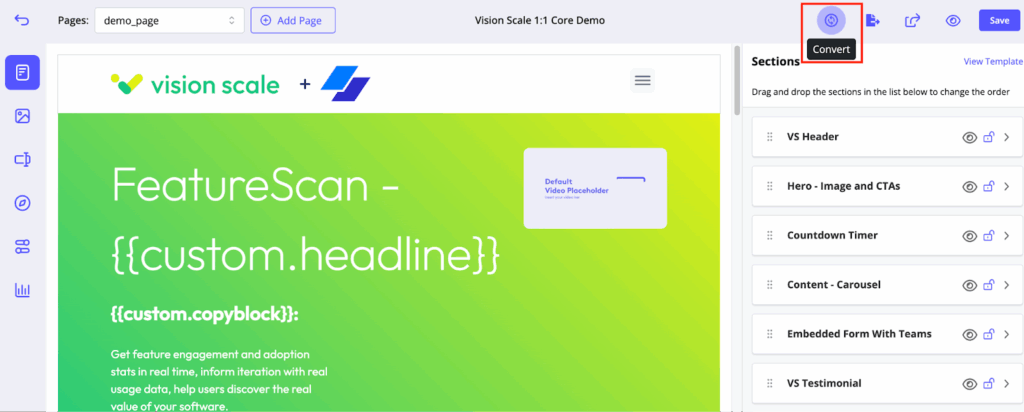
This action will permanently disconnect the page from its original template, allowing you to add and update sections independently. This change cannot be undone.
Save Page as Template
Convert successful standalone pages into reusable templates:
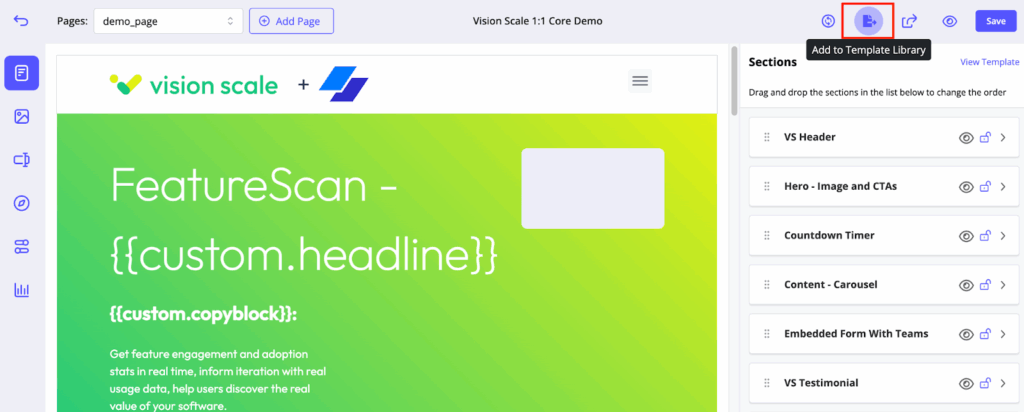
- Template Creation: Save your page layout to the Template Library
- Team Sharing: Make your designs available for others to use
- Reusability: Turn one-time designs into scalable assets
Technical Notes:
- Filenames must be unique and contain no spaces
- This action will add the file and any sections and/or components it requires to the Template Library.
Ready to launch your first page? Check out our Pre-Launch Checklist!
Views: 1983