How to Manage Access Protection
To begin using access protection, complete the steps below.
Step 1: Create User Groups
Define groups of users allowed to access specific Experiences.
- Select the gear icon on the main menu and in the menu that drops down, select Access Protection.

Access Protection menu item - Create or modify a group. Click Add Group or select an existing group to edit.
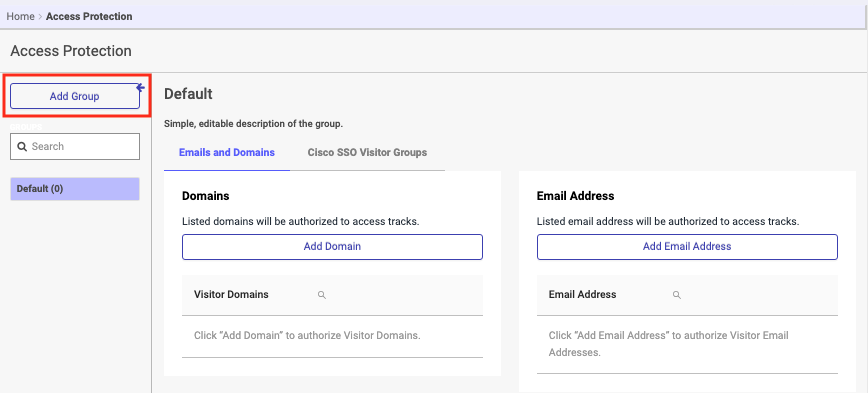
Add Group button - At the prompt, add users or domains. Enter email addresses or domains manually or paste a comma-separated list. To apply the changes, click Save. (You can go back and change the name later if you wish.)
- You can apply one or more groups as allowed lists to specific PathFactory Experiences (ChatFactory, Templated, Explore, and VEX Events). Maintaining clear groups with obvious purposes keeps things organized and helps multiple users know which group to apply to the Experience they’re building. Examples of common groups are a list of customer email domains, a list of registrants for an event, or specific email addresses of decision makers in a sales cycle.
- Add the email addresses or domains of the individuals you would like to grant access to by clicking Add Domain.
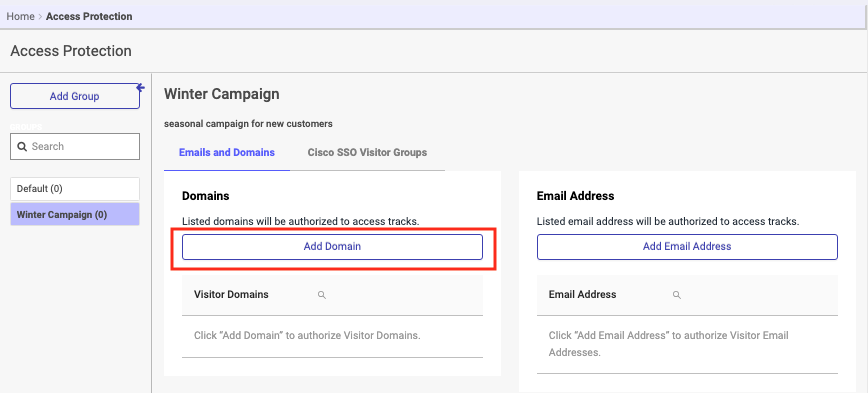
Add Domain - In the dialog that opens, you can add by manually typing it in or by uploading a CSV file.

Add the Domains When you are finished, click Add Domain to lock them in. You can edit or delete these values at any point.
Note: Anyone who has an email address in the Domains list or the Email Address list will be able to access the Experience.
Step 2: Customize the Language
Once you have set up your groups, you can set up the languages for the messages visitors will receive when there is access protection applied to a content track or event.
- Select the gear icon on the main menu and in the menu that drops down, select Languages.

Languages menu item - On the screen that opens, select the Access Protection tab.
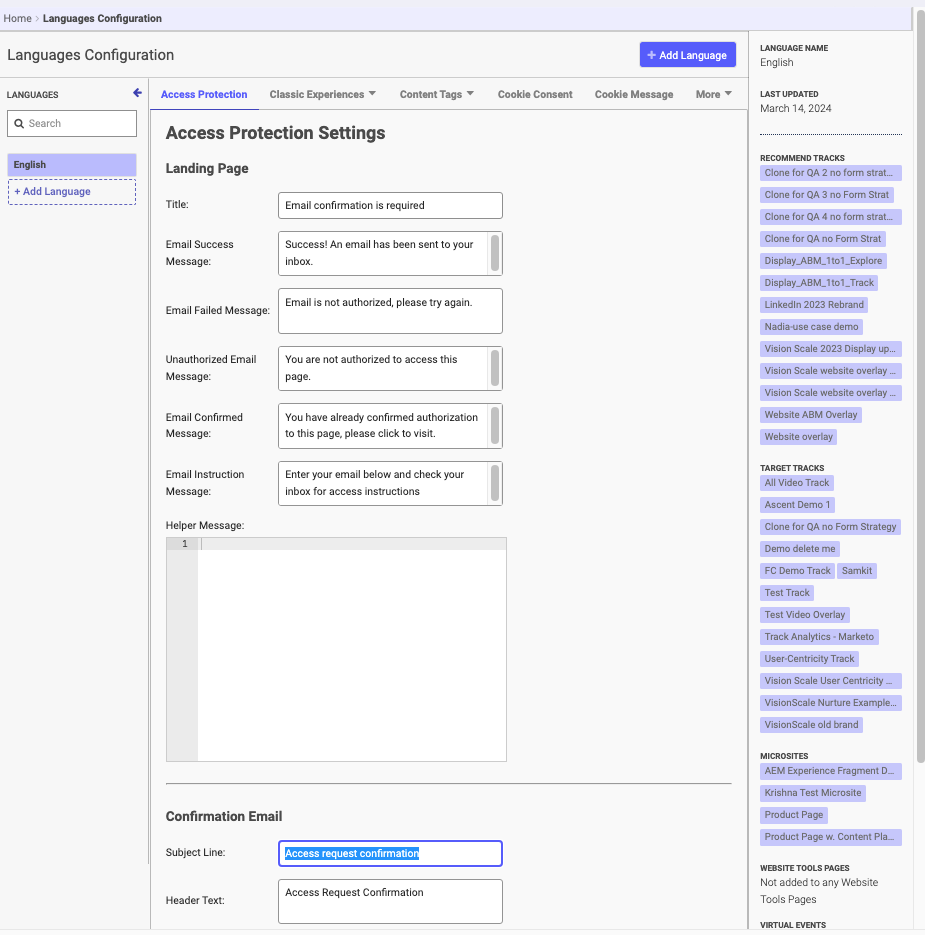
Languages Configuration - In the left sidebar, select the language group your Experiences will use.
- Customize all the messages a visitor might encounter on the landing page and in the confirmation email.
Let’s review each message type for the landing page.
- Title: The title a visitor will see when they try to access a protected track/ event
- Email Success Message: The message a visitor will see when they have entered an email address that is in the list of email address/ domains entered in the group
- Email Failed Message: The message a visitor will see when they enter an email address that doesn’t exist in the group list
- Unauthorized Email Message: The message a visitor who is not a member of the allowed group will see
- Email Confirmed Message: The message a visitor will see when they have already gained access to the track/ event and need to go to their email to click the link to access
- Email Instruction Message: The message a visitor will see when they try to access a protected track/ event
- Email Body Content: The message a visitor will get in the email they receive for successfully gaining access to the track/ event
- Helper Message: The message that appears when a visitor is trying to access a track under the button to help them through the process
Let’s review each message type for the confirmation email.
- Header Text: Copy for the header of the email’s body content. This is not the subject of the email.
- Body Content: Copy for the body of the email.
- Button Text: Label for the button visitors must click in the confirmation email.
Step 3: Customize the Message Appearance
Determine the look and feel of the email message for the given user group. You have extensive options to control the design, appearance, and branding of your access protection emails for tracks, microsites, and VEX sessions. Customization will help to ensure your visitors feel confident engaging with both the form and automated email link that is sent to access your Experiences.
- Select the gear icon on the main menu and in the menu that drops down, select Appearances.

Appearances menu item - From the on-page navigation, select Access Protection. You may have to select More to see this option.

Access Protection tab - From the left sidebar, select the appearance your PathFactory Experience will be using.

Access Protection Settings - Work through all the options, customizing the font and colors of the landing page message and emails. The live preview on the left updates with your choices.
- When you’re happy, select Save Access Protection Settings.

Save settings button
Step 4: Customize the Sender Name for Confirmation Messages
Customize the sender name for confirmation emails to establish trust with recipients.
Note: To do this, your sender email domain must first be set up by PathFactory support.
- Click on your login name in the top right of the screen. Then click Organization Settings.

Organization Settings menu item - From the on-page navigation, select Access Protection tab. (You may have to select More to see this option.)
- In Sender Name, enter your desired name.
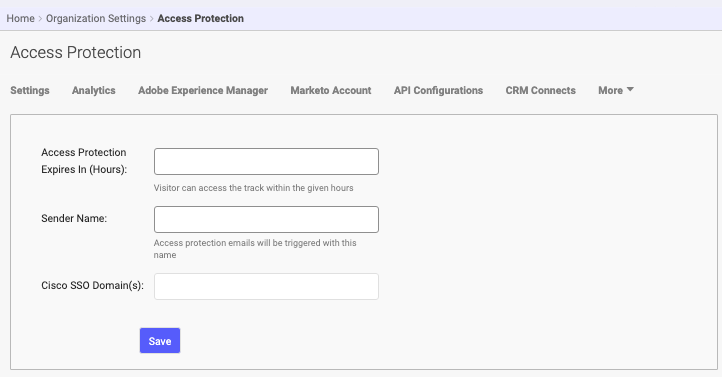
Organization Settings Access Protection - Select Save.
How to Add Access Protection to a PathFactory Experience
Once you have configured the content for an Experience, you should add access protection to the Experience.
Visitor Feedback Scenarios
Visitors receive the following messages based on their access status as described below.
-
- Email Verification Required: Visitors see a prompt to enter their email address, receive a confirmation link via email, and gain access to the Experience after clicking the link to verify ownership.
- Immediate Access: Visitors in an Allowed Group are granted instant access to the Experience without needing email verification.
- Access Denied: Visitors who are a Disallowed Group or Blacklisted are shown a message informing them that they cannot access the Experience.
- Incorrect Email: Visitors entering an email address not included in the Allowed Group are prompted with a warning message to try again with a valid address.
How to Add Access Protection to a Templated Experience
You can create groups and allow them access to the Content Page and Landing Pages in your Templated Experience. You can find out more about Templated Experience by reading Introduction to Template Experiences. To add access to your Experience, follow these steps.
- Open the Templated Experience for which you want to edit access.

Edit mode - Open the Experience and then click on the Details tab.
- Click the Edit button to modify Access Protection, as shown on the screen capture below.

Details tab Edit button - The Edit menu for Access Protection opens. You now can edit access for Content Page and Landing Pages for your Templated Experience.

Access Protection on Details tab - For Content Page access, select the Protection Type – Email or None. If you select Email, your viewers will see a prompt to submit their email for verification before they are granted access to this Templated Experience. If you select None, your viewers will not need any special access to view this Templated Experience.
Note: If you choose no protection, and do not add Allowed Groups or Disallowed Groups, all viewers will be able to see this Templated Experience. By adding Allowed Groups and Disallowed Groups in the next steps, you are providing access for specific groups of users.
- For the Allow Groups list, click the arrows to select the groups for which you want to provide access to this Templated Experience. These are groups that you or someone else within your organization has created.

Access Protection Disallow Groups - Do the same for the Disallow Groups, as shown in the screen capture below. You can choose to add groups to Allow Groups or to Disallow Groups, or both.

Allow and Disallow Groups - Next, create or edit an access rule for your Landing Pages in this Templated Experience.

Landing Page Access - From the dropdown lists available, select the Landing Page, Protection Type, and Allow Groups and/or Disallow Groups.
- To add a rule, click +Create Rule. To delete a rule, click its associated trash bin.
How to Add Access Protection to a VEX event
To apply Access Protection to a VEX event, follow the steps below.
User Group Access
- To allow or deny access to user groups, select the Event Setup tab.

VEX Event Setup tab - Scroll down the tab to the Access Protection menu.

VEX Event Setup tab - Using the fields provided, select a Protection Type, Groups, and Disallow Groups as needed.
- To lock in the changes, scroll to the bottom of the tab and click Save. To reverse the changes you just made, click Reset.
How to Blacklist Specific Email Addresses
Blacklisting allows you to explicitly block individual email addresses from accessing your PathFactory Experiences, even if they belong to an Allowed Group. Follow the steps below to blacklist specific email addresses.
-
Select the Event Blacklist tab.

Event Blacklist tab - To add an email address to the Blacklist, click Add Email. At the prompt, enter the email address.
- To edit or remove an email address from the list, click on the available links.

Blacklist Edit and Remove links
Views: 627