Collections are groupings of content assets you can create from the Content Library and then include as a whole for use in Templated Experiences and Content Playlists, Website Tools, and Revenue Intelligence Content Plays.
To create a Collection, you may add content assets into key groupings one by one from your Content Library or else use content tagging rules to automatically evaluate assets in the Content Library and create asset groupings.
This feature is available in the PathFactory version released in 2024 only. If your organization is using a version of PathFactory released before 2024, you may create a Collection via Website Tools only, and these Collections would not be available for Templated Experiences, Content Playlists or Revenue Intelligence. For a refresher on Website Tools, read Configure Sources and Collections for Website Tools. To update your PathFactory instance to the latest version, contact your CSM for details.
To see a video that explains the concept of Collections, watch a 5-minute Video Walkthrough of Collections.
Types of Collections
There are three types of Collections: Manual, Smart, and Track.
1. Manual Collections
A Manual Collections is a static group of content assets that you have added individually. Manual Collections provide a high level of control over the content included in any Collection and associated experiences you create. This type of Collection is ideal for situations where precise, curated control over content selection is crucial for visitors.
Advantages of Manual Collections
- Precision: Allows precise selection of individual assets or tags.
- Control: Offers a high level of control over the content included in the Collection.
Examples of Manual Collections
- A Manual Collection named “Thought Leadership Insights,” featuring content authored by experts and influential articles from external sources.
- A Manual Collection named “Customer Testimonials” that contains meticulously curated customer endorsements.
2. Smart Collections
Smart Collections use predefined rules to automate content grouping based on your preferences. When assets matching established rules are added to the Content Library, they are automatically included in the Collection(s). This automated approach streamlines the content management process, making it efficient and ensuring that only assets meeting specified criteria are surfaced. To find out more about tagging content assets, read What are Content Tags?
Advantages of Smart Collections
- Automation: Streamlines content management through automated grouping based on predefined rules.
- Efficiency: Automatically includes assets matching rules, saving time and improving consistency.
- Scalability: Scales well with growing content libraries, accommodating additions seamlessly.
Examples of Smart Collections
- A Smart Collection named “Industry A,” which automatically curates content that showcases successful campaigns, case studies, and industry trends specific to key verticals.
- A Smart Collection named “Event Hub B,” which automatically features promotional materials, speaker bios, and related content for upcoming marketing events and webinars.
- A Smart Collection named “Persona” that automatically inherits any new content added to your Content Library that is tagged for that audience.
3. Track Collections
Track Collections are simply converted content tracks (Target and Recommend).
Note: This feature is available in the user interface released in 2024 only. Contact your CSM for details on how to update your PathFactory instance to the latest version.
How to Create Collections
To create Collections using the latest version of PathFactory interface, follow these steps.
How to Create a Manual Collection
To add content to a Collection one asset at a time, follow these steps.
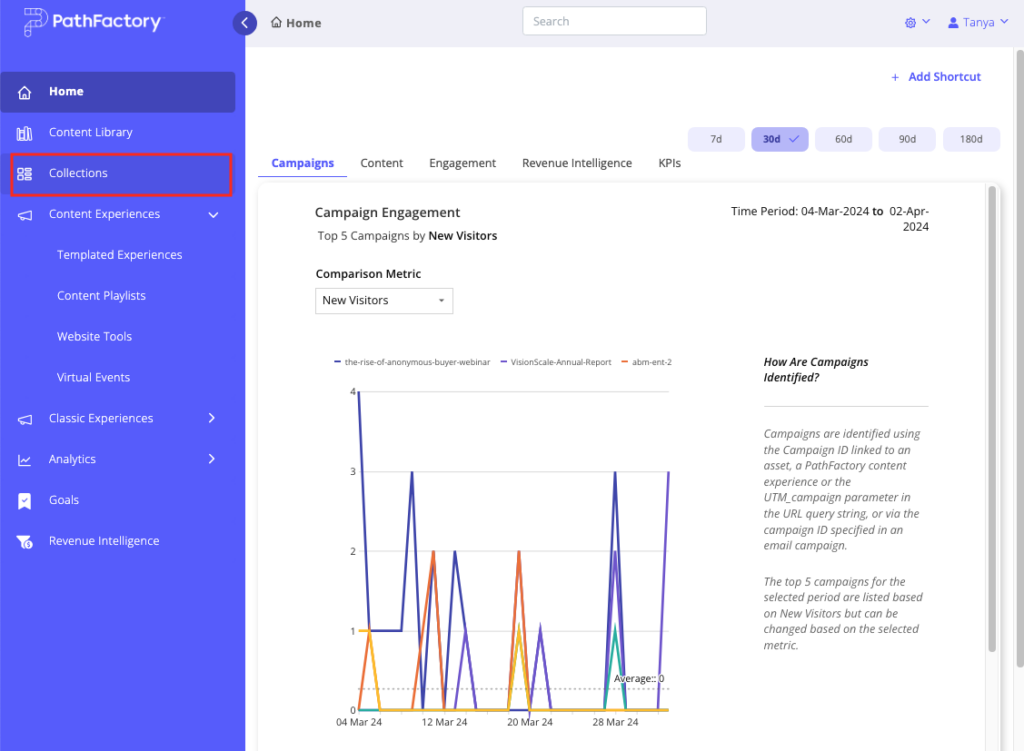
- On the left navigation menu, click Collections.
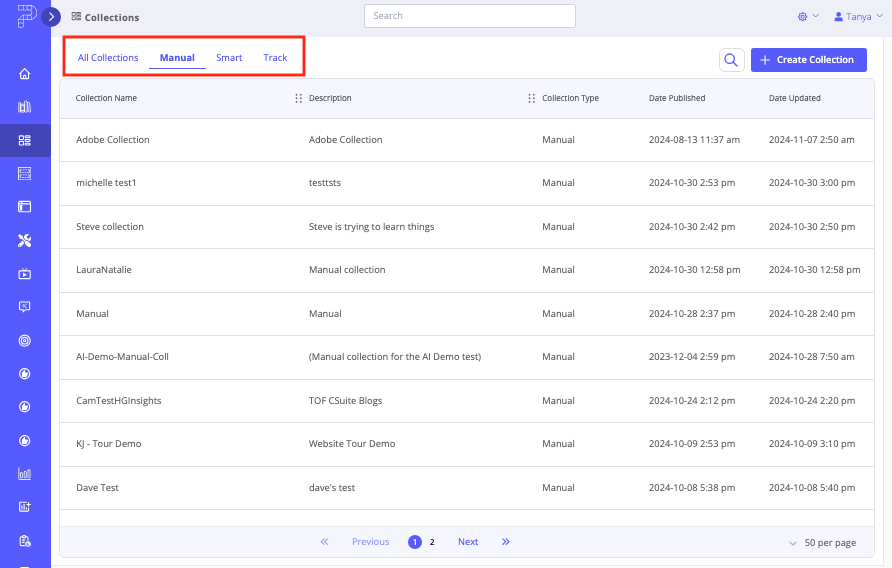
- A list of existing Collections appears, with tabs across the top of the screen that allow you to switch between All, Manual, Smart, and Track Collections.
- To begin creating a new Collection, click Create Collection.
- In the menu that appears, select Manual Collection.
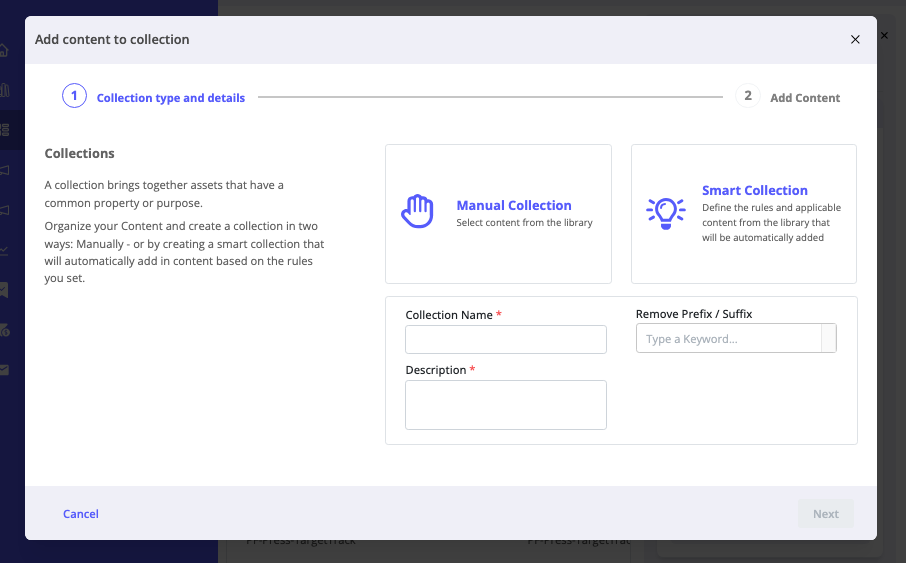
- Enter the details for your Manual Collection as follows:
- Collection Name: Enter a name that describes the Collection so you remember why it was created later (for example, “Corporate website blogs”).
- Description: Enter a description of the Collection. Keep in mind if others are using your Collection, you’ll want to add details on when to use this Collection.
- To proceed, click Next.
- Now you see a list of assets you can add to your Manual Collection. Use the filters to sort the column headers to narrow your search.
Note: You’ll notice text that appears when you hover your mouse over a truncated content title, which displays the full title. You may also adjust the column width so that you can see the full title of the content on screen.
- When you are finished selecting assets for the Collection, select Done.
Note: Content assets are added to the Manual Collection in the order you select them. To reorder them, you can do so after adding the Collection to a Templated Experience or Content Playlist. For detailed instructions on reordering assets, read the article, How to Manage Assets on the Content Configuration Tab. - You are automatically returned to the Collections list, and you can see your newly created Collection there, as highlighted in the example below.
- When you create your next Experience, Content Playlist, or PFRI Content Play, you will be able to add this Collection to serve as its content assets.
How to Automatically Create a Collection Based on Rules
To create this type of Collection, the process overview is listed below.
Note: You may create Collections for Templated Experiences in the latest user interface (2024 and onward) only, not in the Legacy user interface.
As content assets are scanned, they are assessed against the rules (if any) in the order you have previously defined.
If the first rule does not match the content asset, the asset is assessed against the second rule, and so on. Once a content asset is assessed, the vetting process for that asset stops, and the next content asset is scanned.
The analysis process usually takes mere seconds, but may take a few minutes depending on the Content Library’s size and the number of rules you have added.
To automatically create a Collection of assets based on content tags, follow the steps below.
- On the left side navigation menu, select Collections.
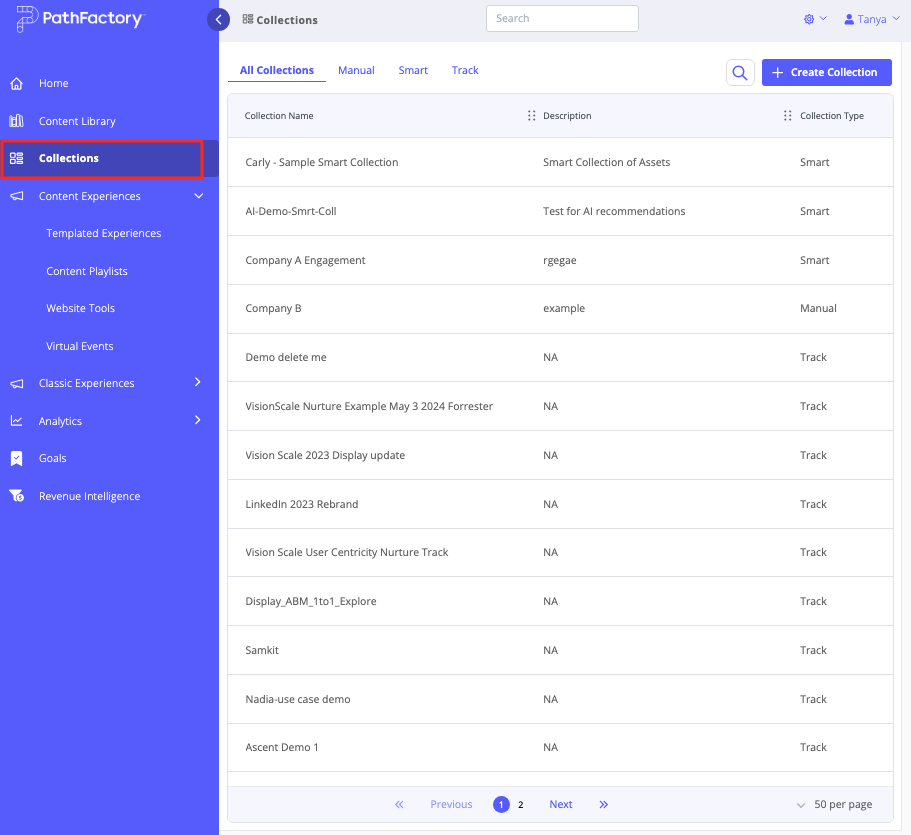
- On the screen that appears, select Create Collection.
- In the popup menu, select Smart Collection.
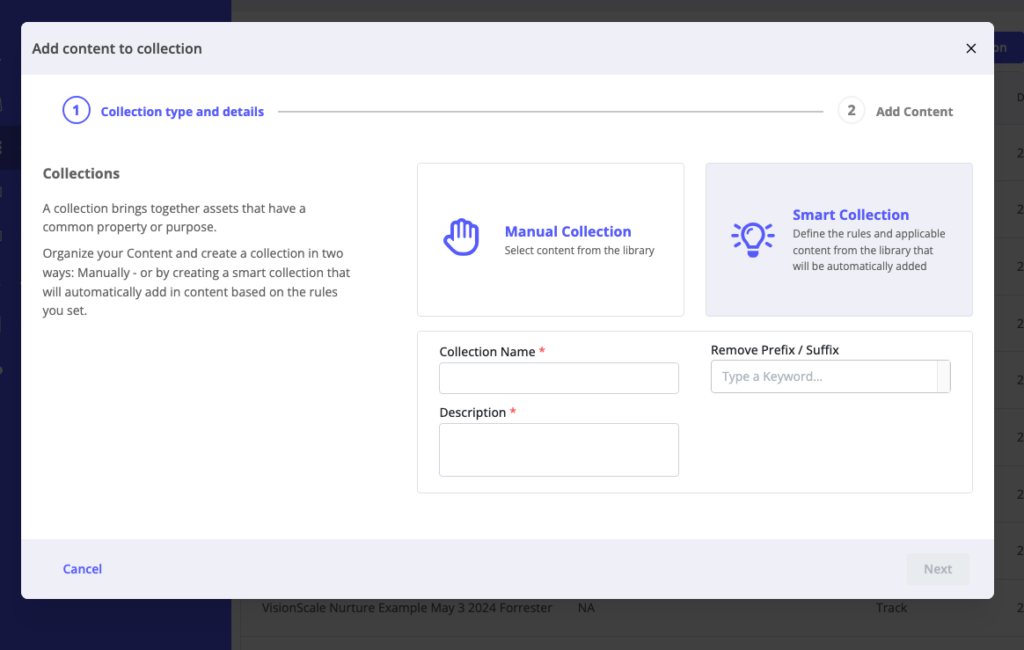
- Enter a name for the Collection, a description, and if you wish to refine the results, you can opt to remove a prefix or suffix from the assets in the Collection. For example, you can remove https:// from all URLs that are displayed in the Collection.
- Click Next.
- A popup menu appears so that you can configure the rules for assets in the given Collection.
The use of AND and OR in smart rules provides flexibility in defining conditions for content inclusion within a Smart Collection. Use AND for more specific, concurrent conditions, and use OR for broader, alternative conditions when defining smart rules for your Smart Collections.
Here’s an explanation of when to use AND and when to use OR for Smart Collections.
- AND: Use when you want to create more specific criteria for content inclusion, when multiple conditions must be met simultaneously for an asset to be included in the Smart Collection.
For example, if you want to include assets that are both tagged with “software” AND authored by a specific author, you would use AND. This means that only assets meeting both criteria will be included.
- OR: Use OR when you want to broaden the criteria for content inclusion, when assets can meet any one of the specified conditions to be included in the Smart Collection.
For example, if you want to include assets that are either tagged with “software” OR authored by a specific author, you would use OR. This means that assets meeting either of these criteria will be included.
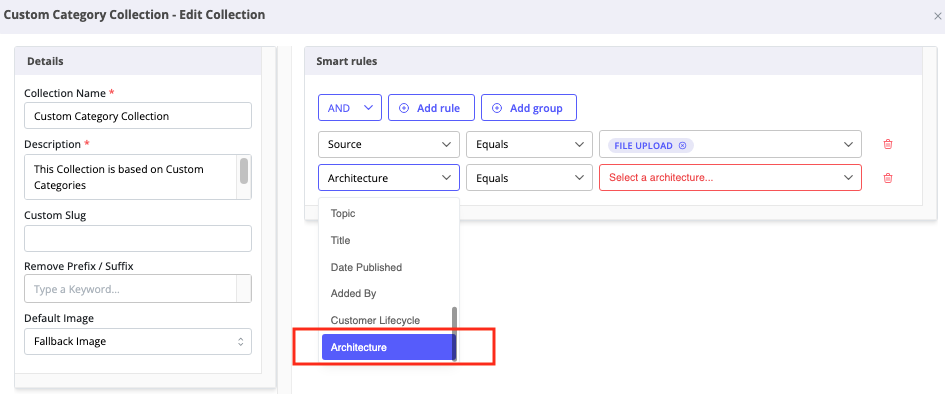
You’ll notice that when you select a Collection source, all categories are listed there, including Custom Categories you added manually. To find out more about Custom Categories and how to use them, refer to Tutorial: How to Manage Assets, Tagging and Taxonomy in Your PathFactory Content Library.
Below is an example of a Custom Category, Architecture, displayed in the list of sources to choose from when you create a Collection.
How to Add a Collection to a Templated Experience or Content Playlist
Collections help simplify and standardize the workflow across users who create and use Templated Experiences. For example, a Collection of “Product Demos” provides visitors with a curated set of assets showcasing specific product functionalities.
- Open a Templated Experience or Content Playlist in edit mode. To do this, on the side panel select Templated Experiences or Content Playlists.
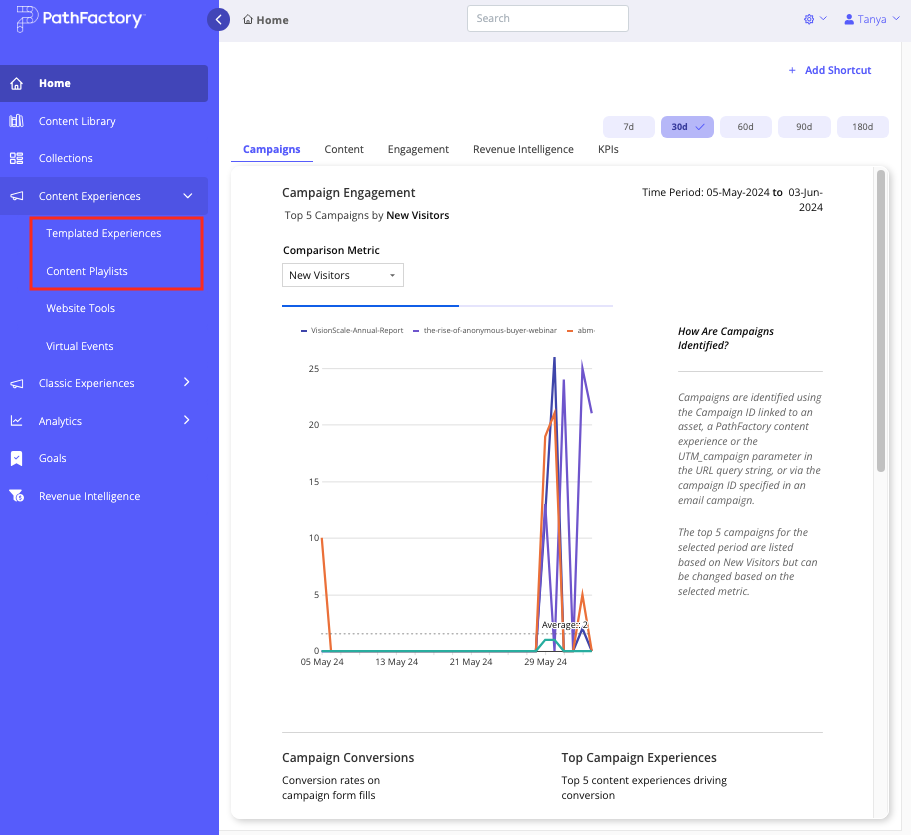
- In the window that appears, activate the checkbox associated with the Templated Experience or Content Playlist you want to edit, and then click the edit icon, as shown below.
- With the Templated Experience or Content Playlist open, select the Content Configuration tab.
- On the Content Configuration tab, select the Collections sub tab.
Note: If you prefer to add individual assets here instead of adding a Collection, you would select the Content Assets sub tab.
- If you have not previously added a Collection, or you want to add another one, click Add Collections.
- In the popup menu that appears, select as many Collections as you would like to add to your Templated Experience or Content Playlist. To find the Collections you want, use the search field and sort the column headings to narrow down the options.
Note: To view the assets that are contained within a Collection, select the Collection name. A panel on the right side of the menu displays a collapsed list labeled Assets in Collection. Expand the list to see which assets have been added to the given Collection or use the Search field to find a specific asset. An example is shown below.
- When you are finished adding Collections, click Save. To cancel without saving your additions, click the x at the top right of the Insert Assets menu.
Note: To override the title or other attributes of a content asset or Collection, refer to the article, How to Manage Assets on the Content Configuration Tab.
How to Create Collections Directly Within Templated Experiences & Content Playlists
You can streamline content curation by creating Smart or Manual Collections directly within Templated Experiences or Content Playlists.
Any Collection you create—whether Smart or Manual—is automatically added to the specified Templated Experience or Content Playlist and is immediately ready to use.
Note: To learn more about building Templated Experiences, read Introduction to Templated Experiences. To read about Content Playlists and how to use them, read Introduction to Content Playlists.
Follow the steps below to begin creating a Collection within a Templated Experience or Content Playlist.
- Begin by opening the Templated Experience or Content Playlist where you want to add a Collection of content assets.
- With the Templated Experience or Content Playlist open, select its Content Configuration tab. This tab allows you to manage all content-related settings.
- To begin creating a Collection for an Experience:
- For a Content Playlist, click Edit Content.
- For a Templated Experience, select the Collections sub tab and then click Add Collections.
- For both Experience types, the Insert Assets menu opens. Select the Content Library radio button as shown below.
Next, depending on which type of Collection you are creating, a Manual or Smart Collection, follow the appropriate steps below.
- A Manual Collection is a hand-picked set of content assets that you select individually, giving you complete control over what appears in the Collection. This option is ideal when you want to curate specific items.
- A Smart Collection is automatically populated based on predefined rules and criteria, such as tags or metadata. This option allows for dynamic updates to experiences associated with Collections. As new content that matches your set conditions is added to your Library, associated experiences will automatically get activated with the new content without manual updates.
Create a Manual Collection
- Manually select the checkboxes for the content assets you want to include in the Collection.
- After selecting the individual assets, click Update Assets to save them as a Collection.
- You’ll see the newly created Collection in the list of Collections as shown below.
Create a Smart Collection
- On the Insert Assets menu, with the Content Library radio button selected, click the filters icon as shown below. Do not select any individual content assets.
- Apply filters to the list of content assets to drill down to the assets you want to use. This helps narrow down the content shown s, making it easier to find assets that best fit your marketing goals associated with the experience you are creating. Below is an example of the Content Type filter options.
- As you apply filters, you will see a Collection taking shape. Adjust the filters as necessary to refine the results.
- After you have set the filters and are happy with the assets selected for your Collection, click Create Smart Collection as shown in the screen capture below.
Note: Don’t see the Smart Collections button? Make sure you haven’t manually selected any individual content assets. For the Smart Collection button to appear, there should be no content manually selected.
- A popup menu opens for you to enter a Collection Name and Description. Optionally, you may add a Custom Slug and Remove Prefix/Suffix to customize the URL and naming convention.
- To save the new Smart Collection, click Submit. To exit without saving, click the X on the top right of the popup menu.
- In a few moments, you see the new Smart Collection listed on the Content Configuration tab, under the Collections sub tab as shown below.
Take advantage of Collections to streamline and simplify experience creation workflows and content management. If you have additional questions on adopting the use of Collections, please reach out to your CSM to learn more about how to get the most out of this powerful feature.
How to Add a Custom URL Slug to a Collection
A URL slug refers to the end part of a URL after the backslash (“/”) that identifies the specific page or post. You can create custom URL slugs for Collections. This gives you added control over branding and descriptiveness in the URLs you use to activate content experiences.
Follow these steps to customize the slug name for a Collection.
- Open Collections by clicking on the Collections menu item as highlighted in the screen capture below.
Collections menu item
- Select a Collection from the list. You’ll notice a menu appear on the right side of the screen.
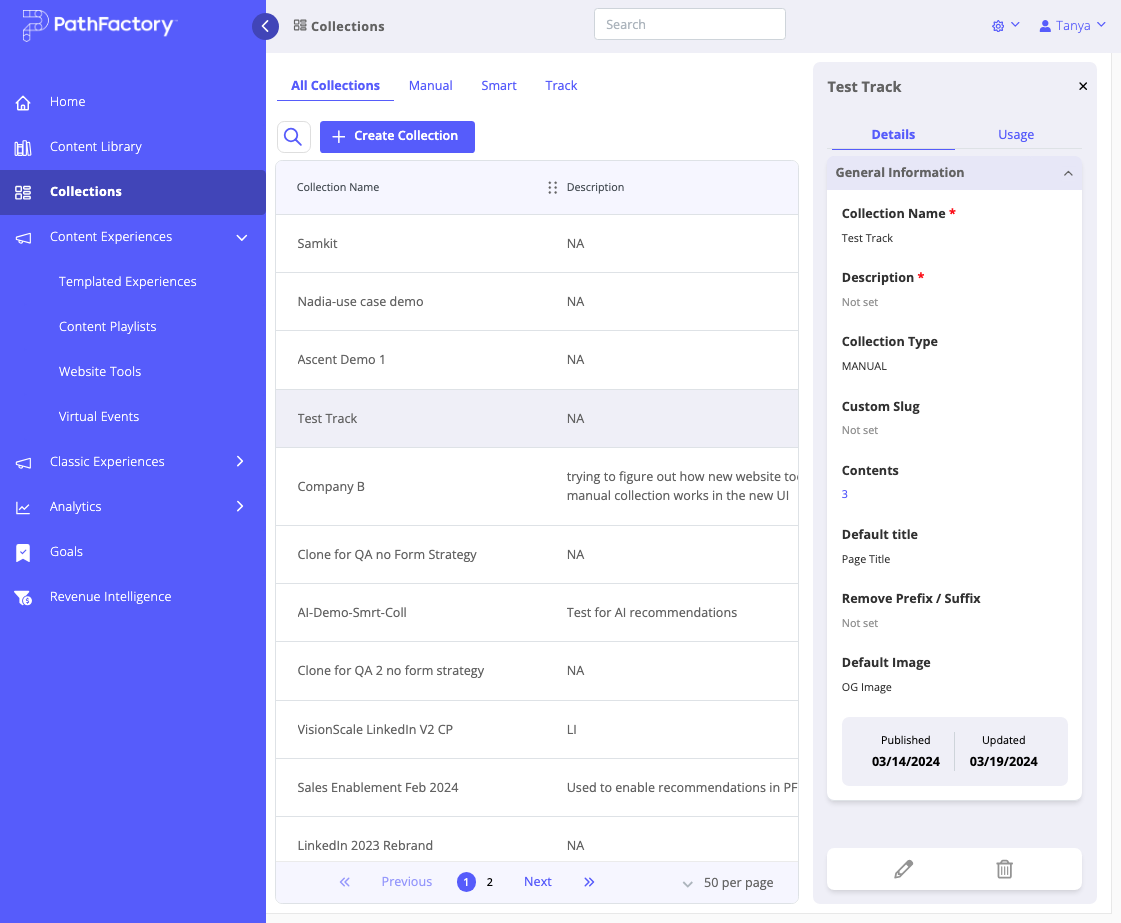 Collections main view
- Hover over the Custom Slug field until a pencil icon appears.
Custom Slug field
- Select the pencil icon and type in a name of your choosing.
- To save the new name, click on the checkmark. To cancel without saving the new name, click on the X.
Custom Slug field
Note: Updating the collection slug automatically updates this value in all Experience links associated with this Collection.
How to Include a Collection for a Revenue Intelligence Content Play
To find instructions on how to leverage Collections and send a Content Play from within Revenue Intelligence (PFRI), read How to Use PathFactory for Revenue Intelligence Content Plays.
Examples of using Collections in PFRI are as follows:
- Manual Collection – a curated set of assets for executive-level engagements, presentations, and strategic discussions aimed at driving revenue.
- Smart Collection – A Collection named “Sales Enablement” is used to automatically include assets relevant to a specific stage in the sales funnel.
How to Use Collections With Website Tools
To find instructions on how to create and use Collections within Website Tools, read Configure Sources and Collections for Website Tools.
Examples of how to use Collections in Website Tools are as follows.
- Manual Collection – a company uses a Manual Collection named “Resource Hub” to curate assets for a dedicated section on their website, ensuring a seamless and controlled user experience.
- Smart Collection – Suppose a visitor has previously shown interest in digital marketing topics, specifically email marketing and social media strategies. They have also downloaded an ebook on effective email campaigns. A Smart Collection would dynamically recommend:
- Advanced Email Marketing Guide: A resource aligned with the user’s interest in email marketing, providing advanced strategies and best practices.
- Social Media Playbook: A guide covering social media strategies, acknowledging the user’s broader interest in digital marketing.
- Webinar on Email Campaign Optimization: A recorded webinar focused on optimizing email campaigns, catering to the user’s demonstrated interest in this specific area.
How to View Collection Contents and Download its CSV File
To see a list of content assets in the given Collection, follow these steps.
- With Collections open, from the list of Collections select a Collection you want to view.
- On the quick pane on the right, on the Details tab you’ll see the Contents menu, as highlighted below.
- The number below the Contents heading reflects the number of content assets in the given Collection. Click on the number (as highlighted below) to see a detailed list of the content assets contained therein.
- The Total Collection Contents menu opens. From here you can page through all of the content assets in the given Collection. Use the search field to look for a specific asset. There are filters available to help narrow your search criteria. To apply filters, click Show Filters and then select Add Filter to make your selections.
- You’ll also notice a download icon on the top right of the menu, as highlighted in the screen capture below. Click this button to automatically download a list of content assets to a CSV file, saved to your computer.
- In the downloaded CSV file you’ll see the following information for each content asset in the given Collection:
- Title
- Description
- Date Updated
- Date Published
Views: 198
