We have made some changes within PathFactory for Revenue Intelligence, so that you can embed this instance directly within SalesForce.
You can now configure your homepage to display on start up with Goals or Content Library.
For our Microsites, we have added a search option so you can more quickly locate the Microsite you wish to edit.
We have increased governance for the content library by making URL slugs a mandatory field.
Cookie consent for Standard forms is now more granular, with multiple opt-in fields.
And finally, we have added more sorting filters for target and recommend tracks within Explore pages.
Review key buying signals directly from within Salesforce
PathFactory for Revenue Intelligence is now available to access directly within Salesforce! Now revenue teams can uncover key buying signals from PathFactory as well as configure and share content experiences directly from the platform they work within each day.
PathFactory users with a Revenue Team role type will now be able to see a Revenue Intelligence tab in the main Salesforce navigation. Here they can view aggregate account and opportunity insights as well as uncover details about most active and least active accounts.

Revenue team users can also navigate to individual accounts within Salesforce to review overview metrics, new buyers and topics of interest within an account as well as use the content sharing tool to configure and send experiences to the account contacts. More detailed information and instructions on how to set this up are coming soon.

Custom date filter for accounts dashboard
We have added a custom date filter to let users analyze buying based on internal period or campaign dates.
Once you have specified a custom date range, the dashboard shows the data for that period.
Note: Custom date selection is available from January 1st, 2021 onwards.

Analyze your active opportunities by stage and closing period

Starting with this release, you can see key opportunity metrics by sales stage and closure period so you can choose opportunities by sales play for faster closure.
Note: Custom date filter is not currently available to use when viewing the Opportunity by Pipeline Stage tab.
The matrix view highlights the distribution of opportunities based on closure period and pipeline stage. This view lets the sales user narrow their best actions for maximizing their conversion goals.
Configuring PathFactory homepage
This feature provides you with the flexibility to configure the default homepage for your organization. You can choose if you’d like the Content Library or the Goals pages as your default screen when you login. To set your main page:
Click on your login name on the top right, and then select Organization Settings. Under Organization Settings before Default Image add Set as Homepage with 2 options for dropdown.
- Goals
- Content Library
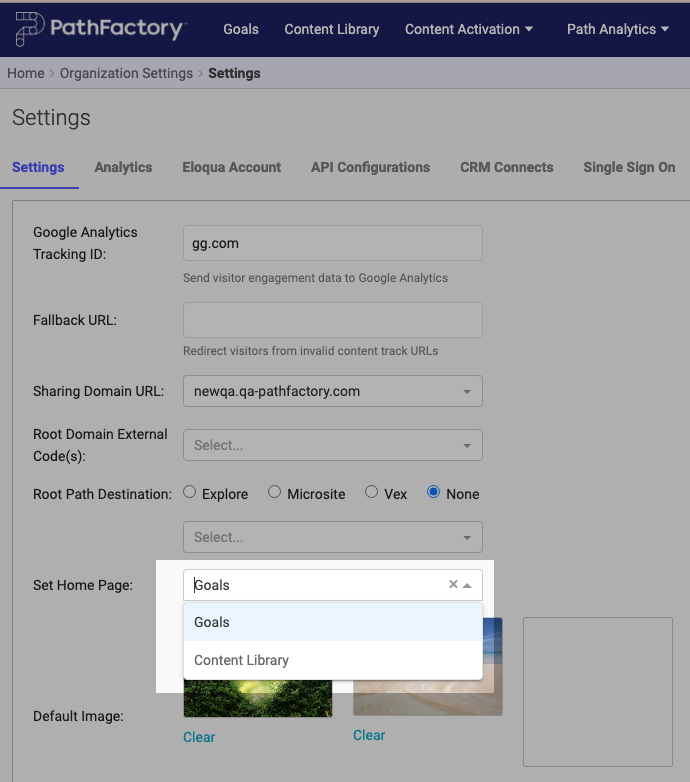
If you select Goals, then Goals is the default option. Similarly, Content Library is the default option if you have selected Content Library.
Search by title in Microsites content
When you create a Microsite page, this implementation lets you search for content by title, quickly and easily, and then add it to the featured content block. This functionality is especially useful if you have a large number of content in the track you are selecting the featured content from. When you start typing in the Contents field, filtered-down content appears, based on what characters you have entered.
Previously, there was no set order for the lists of contents in the drop-down. If the track had a large number of contents, you would have had to keep scrolling.

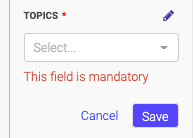
Custom Slug is a required field in the content library
URL slug helps users, as well as search engines, identify a specific page or post. The slug is an important component of SEO as it helps search engines like Google rank your URL based on target keywords. This release makes Custom URL Slug a required field. Additionally only the users with Create/Edit/Delete access to the Content Library will be able to override this field, allowing you with more control over who can update the contents slug. Any user with View Only access can view the slug only.
- The field has a red * symbol next to the title indicating it’s a required field.
Topics dropdown list - The field auto-populates the slug (up to 20 characters) when content is being added to the content library for the first time (from the URL or from the slug column in CSV)
If a user modifies a slug, a message appears as follows: Warning: changing an existing slug will invalidate previously shared links.
If a user deletes a slug entry and clicks Done, the field repopulates the default slug from the url.

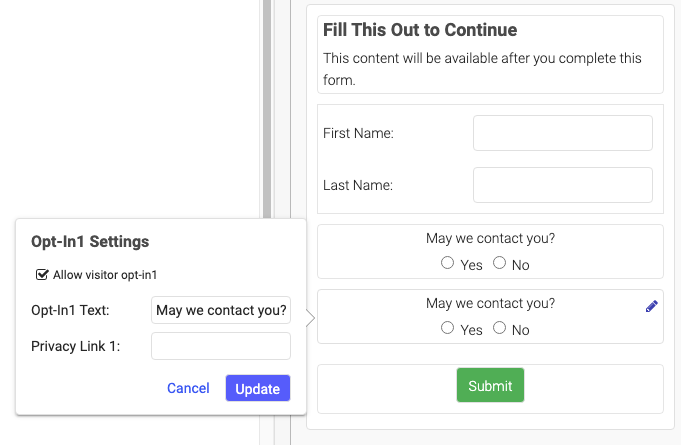
Add multiple opt-in fields for Standard forms
For this release, we have added the ability to configure up to 3 opt-in fields on the standard form available to be used across Target and Recommend tracks. This functionality allows you to collect multiple opt-in options for your visitors to give their consent when completing the standard form fill. These opt in fields are also passed via the Form Capture webhook when form fill takes place.
To use this new feature, follow these steps.
- On the top right corner, click the Gear icon, and then select Forms.
- On the Forms configuration screen, on the top right click the Form Types menu, and then select Standard.
Forms Configuration screen - Next, select a form you wish to edit.
- On the left panel, these options appear:
Form setup menu - Here you can edit the fields and the button color, and you can add more consent popups. Hover your mouse cursor over the Submit button, to add more.
Consent popups - Ensure you are configuring all necessary information before moving on to implementation.
Opt In Settings - Next, add the form to your track. For information on how to add forms to tracks, click here. For information on setting up your webhooks, click here.
Webhook Event Fields


New sorting filters in the target and recommend tracks for Explore pages
These filters let you retain the order in which the contents were added or the order the contents are configured in in the track.
Within the topic carousel for both target and recommend explore pages, we have updated the logic for the Added by date sort filter to point to when the contents were added to the track. This means the contents are sorted based on the order you added them to the track. This filter ensures the content displayed first is always the latest information.
For target recommend pages, you see Order in the track as an additional sort option in your topic carousel. When you apply this sort filter for the contents in your topic carousel, the assets are shown in the order in which they reside within the target track. This ensures the content is displayed exactly as you set up within the track.
To use this new feature, follow these steps.
- Open your Explore page from within the Content Activation menu.
- Select Add Topic Carousel as shown below.
Add Topic Carousel - At the prompt, select the order you want from the dropdown list.
Order Tracks dropdown list - Click Save Topic Carousels or Cancel to leave without saving.
- Now when your clients view the Explore page, they view the content tracks in the order you selected.


Views: 74