In this article we’ll outline the ways to send data to Eloqua via a PathFactory Webhook.
Step 1: Creation of the Webhook Connection
(There are two different methods to achieve this.)
- Option 1: Auto-generation of field mapping via Eloqua API (Note: Eloqua API integration needs to be completed for this option to be available)
- Creation of PathFactory Webhook and Eloqua Form
- Confirmation of Webhook fields to be mapped
- Option 2: Manual creation of form and Webhook field mappings
Note: Used if Eloqua API integration is not set up.- Set up an Eloqua Form
- Create a PathFactory Webhook and map the applicable Webhook fields
Step 2: Creation of a PathFactory CDO and mapping to the PathFactory CDO Records
Step 3: Testing the Webhook
Note: Please contact our support team and we will be happy to help you set up this Webhook.
Step 1: Creation of the Webhook Connection
- Navigate to the Webhooks section of the platform under Settings for Data Configuration.

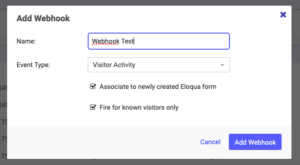
Webhooks menu item - On the top right corner of the screen, click +Add Webhook. Identify which Event Type should be used to trigger the Webhook.
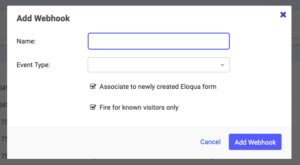 Add Webhook popup menu
Visitor Session
This will trigger the Webhook each time visitor lands on a PathFactory track, Templated Experience or Content Playlist and closes the page, the session will be closed after 30 minutes. NOTE: This is the main Webhook that is used upon setup.
Form Capture
This will trigger the Webhook each time a form is submitted. This will only trigger for Standard Pathfactory forms or third party forms that have a Capture tag implemented on them.
Visitor Activity
This will trigger the Webhook if the visitor performs a specified activity. This can range from the # of assets a visitor touches, or the specific asset a visitor engages with. For this option you will need to create a Visitor Activity within PathFactory which you can find instructions on here.
Website Tools Session
This will trigger the Webhook each time visitor lands on an area of your website that has our Website Tools tracking deployed. The session will be closed 30 minutes after the visitor leaves your site
Virtual Event Session
This will trigger the Webhook each time visitor lands on a Pathfactory Virtual Event Experience. This webhook fires for all visits to the event, whether or not the visitor attends a session. The visitor session will be closed 30 minutes after the visitor leaves the event.
Once the Event type is established you can toggle on the Associate to newly created Eloqua form setting. This auto generates a form within your eloqua instance that automatically maps the newly created Webhook to all possible Webhook fields available in PathFactory. For this option, this toggle should be switched on.
The Fire for known visitors only allows the trigger to fire only if the visitor has been de-anonymized within PathFactory and has an email address associated with their visit. This is ideal because if fired for unknown visitors it will not associate to any contact records in Eloqua.Once you click Add Webhook you see a newly created form within your Eloqua instance. The name convention starts with PathFactoryWebhook. The Webhook that you’ve just created will have already been mapped to that Webhook URL. Note that the Webhook has not been enabled yet. Before doing so, navigate to Event Fields and confirm if you wish for all these fields to be included upon the blind form submissions. If you wish to limit the fields in the Webhook, simply remove them from this section by clicking the delete button to the right.
Option 2: Manual creation of form and Webhook field mappings
Note: Used if Eloqua API integration is not set up.
Step 1: Set Up an Eloqua Form
Create a form in Eloqua and ensure the following:
- The Eloqua form has a field for each of the event field data points for a Form Capture Webhook, Visitor Session Webhook, and/or Visitor Activity Webhook. Click here for definitions of each Webhook field and descriptions of the different Webhook types.
Step 2: Create a Webhook in PathFactory
Create a Webhook in PathFactory that links to the form where https://[Eloqua Instance].t.eloqua.com/e/f2?elqSiteID=[EloquaSiteID]&elqFormName=[FormName]
- Ensure that the fields you would like to receive data for are mapped. If you would like to limit the data that is being sent via the Webhook map only the data points you would like to send and leave all others blank.
- The HTML name of each of the form fields matches the value you have provided in the field mapping area while setting up the Webhook.
Step 2: Creation of a PathFactory CDO and mapping to the PathFactory CDO Records
Create a CDO that contains all the fields within the Webhook form with Entity Type = Contacts and Entity Field = Email Address
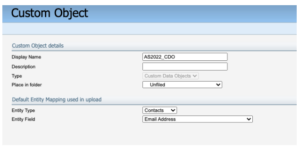
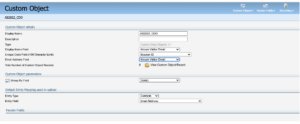
Custom Object
Go to custom object record fields and map it to the Webhook form that was created. Select all fields shown in the Webhook form.
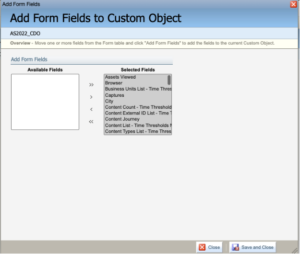
Form Fields
Once the CDO is created, ensure that the following settings are applied so that the unique identifier matches the one within PathFactory and the Email Address maps correctly. This will make it easier to associate CDO records to PathFactory data later on.
- Display Name Field = Known Visitor Email
- Unique Code Field = Session ID
- Email Address Field = Known Visitor Email
Custom Object
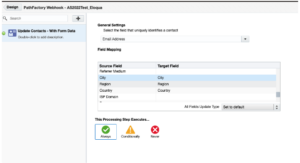
Navigate back to the Webhook Form and add a Update Contacts – With Form Data Processing Step. Identify the contact using Email Address
Clear all auto mapped fields other than Email Address (this is important as fields like City, Region, and Country are matched by Demandbase within PathFactory and this may not match the information provided by a contact within a form. This is also applicable to a field like UTM_source where we capture UTMs from a PathFactory page and not where the lead came from).
Note: Ensure that before saving Email Address is a required field on the form.
Email Address
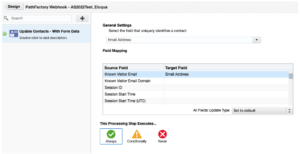
Email Address selection
Add another Processing Step on the Webhook Form with Update Custom Data Object – With Form Data. We recommend that the Key Field used is Session ID as that is how we uniquely identify data that is going to be syncing into eloqua on a per CDO basis.
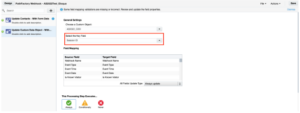
Always button
Save this and execute by clicking Always.
Step 3: Testing the Webhook
Test a Form Capture Webhook
- Create a Form Capture Webhook.
- Create a form in the external system to which you want to send PathFactory engagement data.
- Enable our PathFactory Standard form on one of the assets in a PathFactory content track.
- Engage with the PathFactory asset that has the form enabled and submit the form.
- The engagement data will appear in the target form in the external system within 2 minutes after our standard form has been submitted.
Test a Session Activity Webhook
- Create a Visitor Activity (Session Closed) Webhook.
- Create a form in the external system where you want to send PathFactory engagement data to.
- Engage with one or more PathFactory content tracks you have built in your PathFactory install. Close the PathFactory content tracks after ending your engagement.
- The engagement data will appear in the target form in the external system after 30 minutes from the time you have finished engaging with the PathFactory content tracks.
|
Note
|
Please note that if, after finishing your initial engagement with the content track(s) as outlined above, you subsequently engage again with any PathFactory content track you have in the same browser, this will reset the 30 minute time period needed for the data to appear in the external system form. The new time window will be 30 minutes after you have finished your subsequent engagement with the content tracks. |
Test a Website Tools Session Activity Webhook
- Create a Website Tools Session Webhook in PathFactory.
- Set up a form in the external system where you want to receive PathFactory engagement data.
- Deploy Website Tools on your website.
- Add the Guide Promoter to a page on your site and include a form CTA in the guide.
- Visit the webpage and submit the form via the CTA.
- The engagement data will appear in the external system’s form within 30 minutes after you complete your interaction on the website.
Test a Virtual Event Session Activity Webhook
- Create a Visitor Activity (Session Closed) Webhook in PathFactory.
- Set up a form in the external system to receive PathFactory engagement data.
- Visit the Virtual Event Experience in PathFactory and register for a session.
- After leaving the event, the engagement data will appear in the external system’s form within 30 minutes.
Test a Visitor Activity Webhook
- Create a Visitor Activity Webhook.
- Create a form in the external system where you want to send PathFactory engagement data to.
- Engage with one or more PathFactory content tracks you have built in your PathFactory install, ensuring that the criteria set in the visitor activity is fulfilled.
- The engagement data will appear in the target form in the external system after 30 minutes from the time you have finished engaging with the PathFactory content tracks. Close the PathFactory content tracks after ending your engagement.
|
Note
|
Please note that if, after finishing your initial engagement with the content track(s) as outlined above, you subsequently engage again with any PathFactory content track you have in the same browser, this will reset the 30 minute time period needed for the data to appear in the external system form. The new time window will be 30 minutes after you have finished your subsequent engagement with the content tracks. |
Views: 185