ChatFactory is an AI Buying Agent that enables your buyers to navigate their own journey through personalized, self-service experiences. Using a generative AI-driven conversation engine and an AI content recommendation engine, ChatFactory AI Buying Agents help B2B buyers easily access the information and content they need without the friction of navigating bloated B2B websites and irrelevant content experiences. B2B buyers who use PathFactory’s AI agents can get individualized personalized conversations and content suggestions, and automatically generate their own landing pages in real time to come back to later or share with a larger buying group.
This article explains the step-by-step setup process for creating and and configuring your own ChatFactory AI Agents. If you need an introduction to ChatFactory, including benefits, use cases, and a quick product tour, please see this ChatFactory Playlist.
ChatFactory Prerequisites
To start using ChatFactory, make sure you have the following items:
- A 300-400 word description of your organization.
- At least 100 content assets (such as website pages or files). ChatFactory’s AI conversation engine and content recommendation engine is trained using these assets.
- A form (e.g., MAP form) to capture buyer details, such as email addresses.
- A Landing Page that is used to define the design and layout of the 1:1 personalized pages that ChatFactory visitors can auto-generate in real time. These pages summarizes their conversations and also saves any AI content recommendations they’ve bookmarked for future purchasing research and engagement.
Note: Please reach out to your PathFactory Customer Success Manager (CSM) so they can help guide and support you through this ChatFactory AI Agent setup process, outlined below.
ChatFactory Setup Process Overview
Setting up your ChatFactory AI Agent involves a series of steps to ensure it functions effectively and aligns with your organization’s goals. The steps below give a high level overview for creating, customizing, and optimizing your Agent.
- Create a Conversation Collection: The conversation collection powers the conversation engine. This collection is a set of assets from your Content Library that ChatFactory AI uses to learn and respond to visitor questions entered into the chat interface. The content in this collection is essential for providing accurate and relevant answers during interactions.
- Create a Recommend Collection: This can be the same collection of content you’ve curated to train your Agent’s conversation engine, or it can be a separate or somewhat different grouping of assets. The Recommend Collection powers the AI content recommendation results when conversing with ChatFactory.
- Configure Your ChatFactory AI Agent: Assign a name to your Agent, select a Templated Experience Landing Page Template that defines the design, layout and components that will display on the AI-generated 1:1 personalized microsite pages that ChatFactory AI generates in real time for B2B buyers, configure form strategies, and link both the Matching and Recommended Collections. Marketers can control the look and feel of AI Agent generated experiences and
- Configure Branding and Layout: Customize the Agent’s appearance to match your brand by adjusting its colors, fonts, and layout.
- View Agent Analytics: Once your Agent is live, you’ll want to track engagement activity for insights that will help you understand and improve the quality and relevance of self-service buyer journeys for your target audiences. You’ll see granular known and anonymous engagement activity and query-level intent at the account level.
Understanding Collections in ChatFactory
Before we dive into the setup, it’s essential to understand the two types of collections that power ChatFactory: Conversation and Recommend.
Note: You can find instructions on how to create Collections in the article, How to Create and Use Collections For Templated Experiences & Content Playlists.
Conversation Collection
- This collection serves as the primary knowledge base for ChatFactory’s AI engine. It includes content assets (such as articles, pages, or documents) that ChatFactory pulls from to answer buyer questions. The AI uses this curated set of content to provide relevant, accurate responses during conversations.
- The Conversation collection should be comprehensive, containing a wide range of content assets that reflect the information buyers are likely to ask about. Including content that includes a holistic cross-section of early, mid and late stage journey content is the goal.
Recommend Collection
- This collection drives ChatFactory’s AI-powered content recommendations. It suggests additional content based on the buyer’s conversations with ChatFactory, helping them dive even deeper into the topics of interest they’re exploring in the chat conversation. The Recommend collection is usually a subset of the Conversation collection or a carefully chosen group of assets designed to encourage further engagement.
- You can create a Recommend collection using any set of content assets that align with your goals and the use case that you are focused on when creating your ChatFactory AI Agent.
How to Create a ChatFactory AI Agent
The first step is to create your ChatFactory AI Agent.
- On the left side menu panel, expand the Experiences menu, and then select ChatFactory.
- The Agents tab displays a list of all Agents created in your organization. Click Create Agent.
- A popup menu opens for you to enter a name for the new Agent, what personalized experience landing page you want the Agent to create, its Conversation collection and its Recommend collection.

- When you have entered the required information, click Done to add the new Agent. To leave without saving the new Agent, click Cancel.
- Once the agent has been created, a backend process is initiated to train the AI with the content in the collection. Depending on the number of assets, size of documents and whether the content was already analyzed previously, this process can take anywhere from an hour to a week (for ~15K net new assets). Talk to your CSM if you need this timeline to be accelerated.
Note: While this backend process is running, you can still configure your agent, so that it looks like your brand, and customize it to fit your workflow.
-
When the AI agent is trained, you will see an option to “Activate” the agent. Click Activate to make your agent live and available for questions and answers.
How to Edit and Customize a ChatFactory AI Agent
Setting up your ChatFactory AI Agent is a straightforward process that ensures it aligns with your brand, functions as intended, and provides a seamless experience for your users. Here’s what you’ll do:
- Configure Agent behavior on the Agent Config tab: Define how the Agent interacts with users, including its functionality and core settings.
- Customize Agent appearance on the Theme Settings tab: Adjust the Agent’s visual design to match your brand’s style and identity.
- Fine-Tune Agent AI Settings with your CSM: Collaborate with your Customer Success Manager to optimize the Agent’s AI functionality for your goals.
- Manage access and security on the Access Protection tab: Define who can interact with the Agent by setting up user permissions and security measures to ensure proper governance.
By completing these steps, you’ll create a fully customized Agent ready to engage with your audience effectively and securely.
Follow the steps below to begin setting up your Agent.
- From the list of ChatFactory Agents, select the one you want to edit. Then click on the pencil icon that appears in its Quick Pane.
- The Agent opens on its Agent Config tab. To modify any of the information here, click Edit.
Step 1: Configure Agent Behavior
On the Agent Config tab, set up the behavior and placement of Recommended content, set the form strategy, landing page, and more. (Your CSM is ready to support you!)
The following settings are available for you to customize the Agent.
- General: Define essential properties, such as the name and primary interaction settings, to establish how this specific Agent engages with users.
- Landing Page Details and Experience Strategy: Choose the templated experience landing page that will be sent to users as a summary of their interactions with the agent, and the content recommendations they have bookmarked. Also configure the number of questions the users needs to ask before being able to create this personalized experience.
- Form Strategy, Display Behavior, and Form Behavior: Customize which forms are shown with this Agent, how and when they are displayed, and how they behave during user interactions.
- Other Customization Options: Configure other options, such as the preview, the history filter, the score based tag. streaming options and more.
Read the article – Configure Agent Behavior for more details on how to configure this tab.
To proceed to customize the appearance of the given Agent to align with your organization’s branding, select the Theme Settings tab next.
Step 2: Customize Agent Appearance
The Theme Settings tab enables you to customize the appearance of an Agent. These settings help ensure the Agent aligns with your organization’s branding, user preferences, and compliance requirements.
Using the available editing menus (highlighted in the screen capture below), customize the colors, logos, fonts and behaviors to ensure consistency with your brand identity at a granular level.
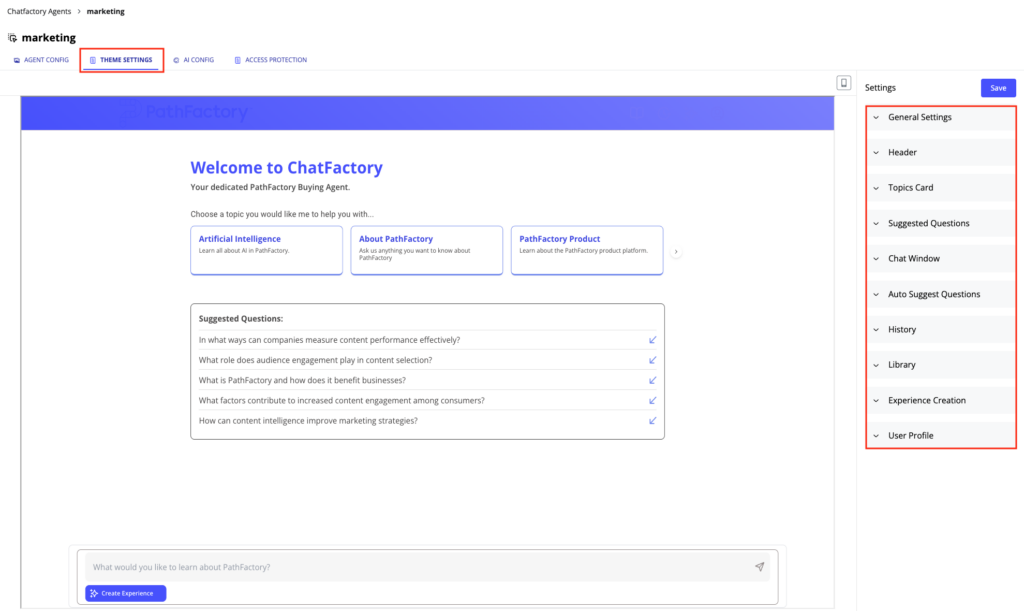
Expand each menu item and adjust the toggles, settings, text and other configurable options. A detailed list of the available settings is available in Customize Agent Appearance.
When you are finished (at least for now) editing the appearance of the Agent, to lock in your changes, at the top of the tab click Save. To exit without saving, click Cancel.
Step 3: Fine-Tune Agent AI Settings
The AI Config tab is exclusively managed by your Customer Success Manager (CSM). Your CSM will collaborate with you during a planning session to adjust these AI settings, ensuring they align with your specific business needs and optimize the performance of your ChatFactory AI Agent. Avoid making any changes to this tab on your own to maintain the intended configuration.
Step 4: Manage Profiles, Access, and Security
On the Access Protection tab, you can choose to restrict access to your ChatFactory Agent to specific groups of users, ensuring that only authorized users or groups can view or modify it, or leave it open for unrestricted access.
User groups in PathFactory are collections of individuals who share similar roles, responsibilities, or characteristics within an organization. They are defined by email addresses or domains and can be applied to manage access to specific PathFactory Experiences, ChatFactory Agents, Explore Pages, and Virtual Events.
How User Groups Work in ChatFactory Access Protection
When setting up Governed Access on the Access Protection tab for an Agent, you can specify groups of users to allow or disallow access to the given Agent.
The Open Access or Governed Access settings control who can interact with the ChatFactory experience overall, while the Show User Profile toggle determines whether visitors can choose between multiple Agents within that experience. The two settings work together to balance access control and personalization.
Note: To learn how to create and manage user groups, read the article, Access Protection Setup and Configuration.
Follow the instructions below to set up access settings for an Agent.
- To begin, on the Access Protection tab, select a radio button for Open Access or Governed Access, as shown in the screen capture below.
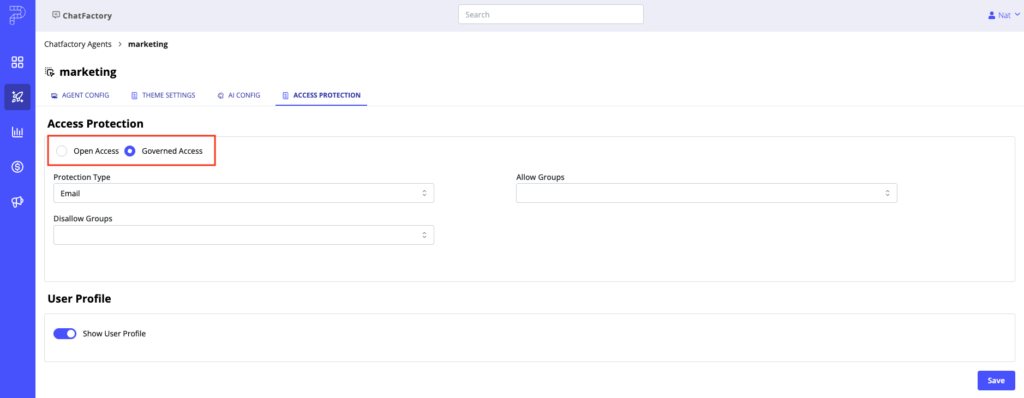
- Open Access: This option does not apply any restrictions to the Agent, allowing anyone to view and edit the Agent.
- Governed Access: This option adds email-based access control to restrict access to the Agent. When you select the Governed Access radio button, you have the following options.
- Protection Type: Select Email from the dropdown list. When visitors attempt to access the restricted Agent, a popup prompts them to enter their email. The Agent’s author will receive an email notification requesting access.
- Allow Groups / Disallow Groups: Use the dropdown menus to define which user groups can or cannot access the Agent.
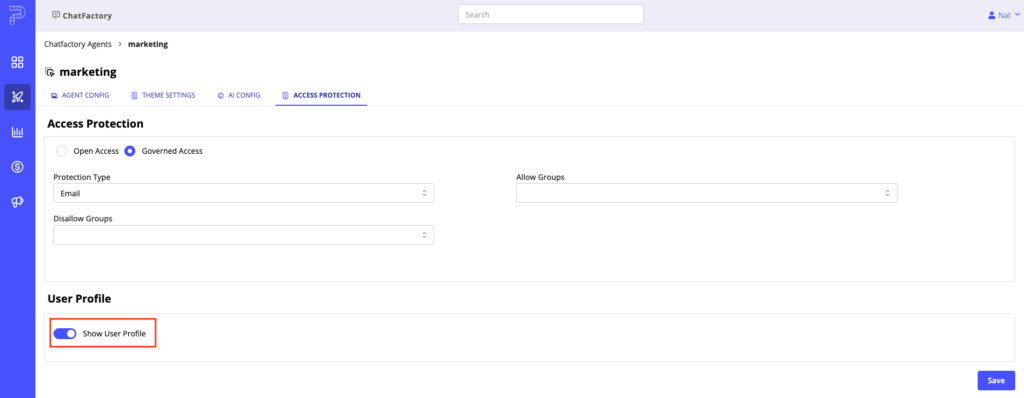
- To make this Agent available to visitors while interacting with a ChatFactory experience, enable the Show User Profile toggle. When activated, this feature allows visitors to select the Agent that best suits their needs, such as those tailored to different business solutions (e.g., networking and security), within the access constraints you’ve defined.
Note: When naming your Agents, make sure the names are intuitive and clear. This helps visitors quickly identify and select the Agent that best matches their needs.
- When you are finished, click Save to lock in your changes. To exit without saving, navigate to a different tab. In that case your changes will not be saved.
What Visitors See With User Profiles Enabled
When a visitor accesses a ChatFactory Agent with the Show User Profile toggle activated, the following actions occur.
- Initial Prompt – A popup menu appears, asking the visitor to enter their name and email address. This step creates a user profile for their session and allows them to select the ChatFactory Agent they wish to interact with if multiple agents are available.

Visitor Identification
- Profile Display – After entering their information and selecting an agent, the visitor’s name appears in the top-right corner of the screen. This indicates their active session.
ChatFactory Profile option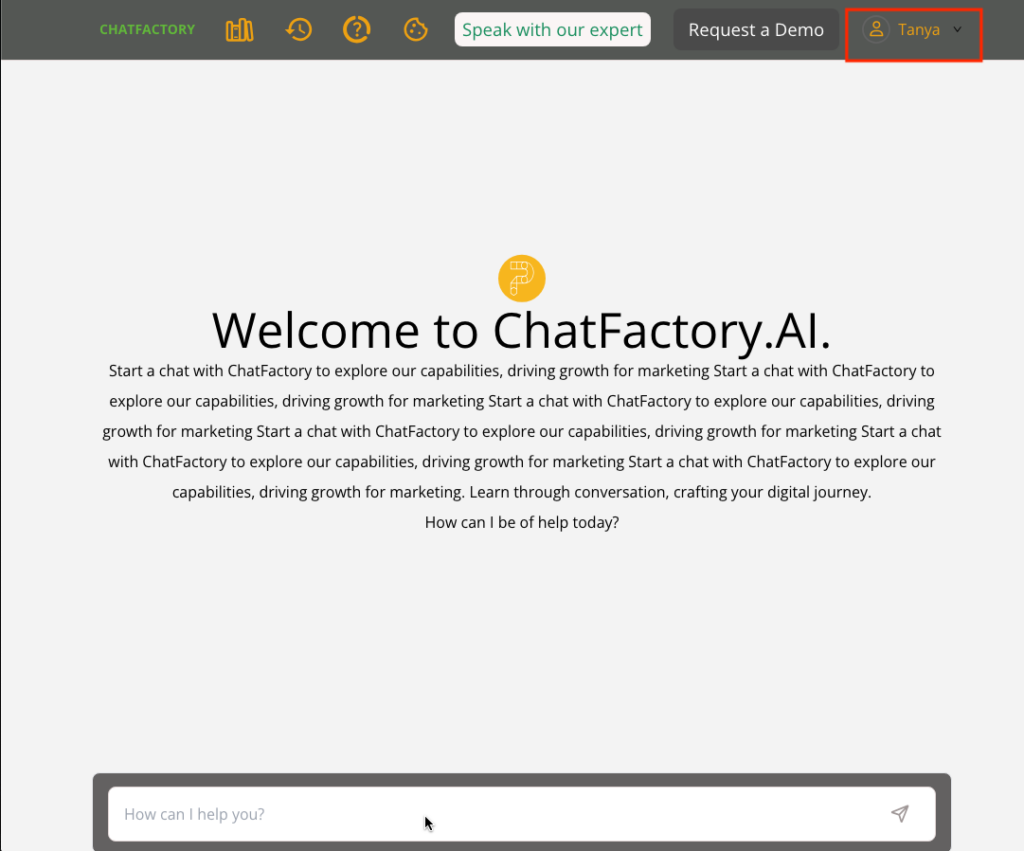
- Profile Options: Visitors can click on their name and select Manage Profile to add more details to their user profile, such as their company name and occupation.
Manage Profile menu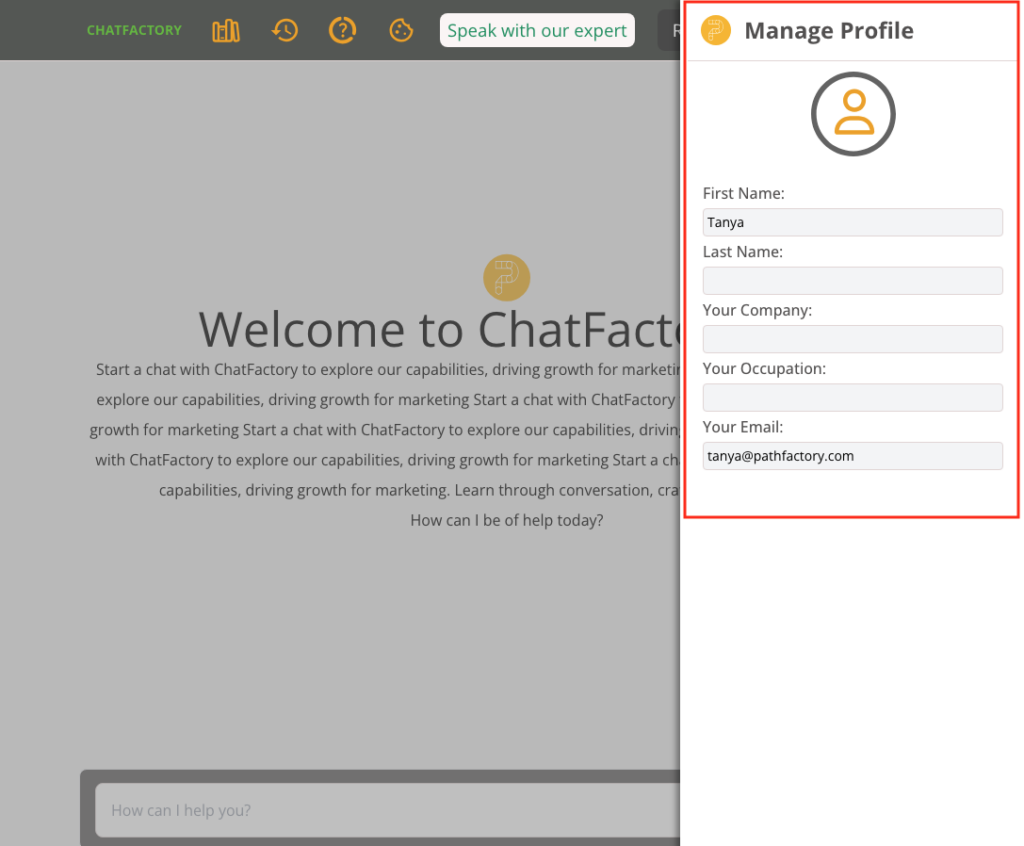
Note: All updates a visitor makes to their profile, including changes to Agents they are using, are saved for them automatically.
How to Test the New ChatFactory AI Agent
After you have created your ChatFactory AI Agent, you’ll want to test its responsiveness and adjust settings as necessary. Follow the steps below to test it.
- Open the list of ChatFactory AI Agents. Select the checkbox for the Agent you want to view, as shown in the screen capture below.

- You’ll notice a Quick Pane menu opens on the right. Select the Agent URL and copy it to your clipboard.

- Paste the URL in a new browser window.

- Verify the Agent behaves and appears as planned. Return to edit the Agent as necessary, to get the results you want.
How to Open a ChatFactory AI Agent for Editing
To make adjustments to an Agent, follow the steps below.
- Select the Agent from the list of ChatFactory AI Agents. If your organization has several Agents, you can narrow down your search results by sorting the columns.

- After you select an Agent, a Quick Pane appears listing the Agent Name, its URL, its Landing Page, and its Matching and Recommended Collection. Click on the pencil icon as shown in the screen capture below.

- The Agent opens on its Agent Config tab. Click through the three tabs and edit the settings as needed.

How to View ChatFactory Analytics
Once buyers have started engaging with ChatFactory, you can view analytic data on their engagement with the Agent.
- Begin my clicking on the Analytics button in ChatFactory as shown in the screen capture below.

2. The ChatFactory Analytics page opens, as shown below.

Data Filters
You can filter the data by Agent, date range, email address, accounts, and visitor IDs to focus on specific interactions. Filters allow you to narrow your view based on what’s most important for your analysis, such as isolating engagement from specific accounts or focusing on particular time periods.
Graphs
The graphs in this section show high-level engagement trends on a daily basis. These visual representations help you quickly spot patterns in visitor activity and conversation volume, offering a snapshot of your Agent’s daily performance.
- Daily Visitors Count – This graph displays the number of unique visitors interacting with the ChatFactory AI Agent each day, giving you a clear picture of daily engagement trends. By analyzing the visitor count over time, you can assess the popularity of the Agent and identify any patterns in traffic, such as spikes after specific campaigns or promotions.
- Daily Conversations Count – This graph shows the total number of conversations initiated by buyers on a daily basis. Monitoring daily conversations helps you track how often buyers are using the Agent, which can reveal the Agent’s utility and engagement levels on different days. It’s a useful metric for understanding peaks in buyer activity and identifying opportunities to improve content or prompts.
Tables (Session-Based Data)
- Conversations Table – This table provides detailed information on individual conversations, helping you understand buyer interactions and analyze their needs. It includes the conversation ID, visitor ID, timestamp, email address, account name (if available), query, Content Match URL, and Response URL. These columns provide insight into the content matched to buyer queries and the responses provided.
- Recommendations Table – This table lists details of the recommendations given to buyers, including the conversation ID, the content that was recommended, and its title. By analyzing which content is being recommended most often, you can gauge whether the recommendations align with buyer needs and adjust your Collections accordingly.
- Visitor Page Views Table – This table captures information on the pages visitors viewed during their session. It includes the visitor ID, start time, email address, city, country, session duration, URL, page view ID, session ID, and context. Reviewing this data helps you understand the buyer’s journey through your content and how effectively the Agent directs them to the right information.
- Form Capture Table – This table lists details on forms that were shown and filled by visitors, including the visitor ID, session ID, email address, account name, form ID, and form fills. This information is crucial for tracking conversion points and evaluating the effectiveness of your form strategy.
How to Export Analytics Data
To see step-by-step instructions on data report export options and scheduling data exports, read How to Download and Share Analytic Reports, a section in the article, Creating, Analyzing & Sharing Data Reports.
What Happens After Your CSM Activates ChatFactory for Your Organization
When ChatFactory is enabled for your organization for the first time, there are several background tasks that happen automatically to get everything ready, including an analysis of your Matching Collection. During this time, the option to create new Agents will be disabled. When the ChatFactory has finished the analysis, you will receive an email notification, immediately after which you may begin creating ChatFactory AI Agents. See the screen capture below for an example of the email you will receive.

After the initial setup, ChatFactory continues working in the background whenever you add new content assets to the Matching Collection. These new uploads are analyzed automatically, ensuring the AI can use the content effectively in future interactions.
Next Steps…
After configuring your ChatFactory Agent, to make it appear on the Landing Page you selected during the Agent creation process, you must embed the ChatFactory Widget there. For detailed instructions on how to embed a ChatFactory widget, refer to the article How to Use the ChatFactory Widget to Enhance Your Landing Pages and Websites.
Views: 583
