With this release we continue to add value to PathFactory for Revenue Intelligence (PFfRI). We have increased the analytics for active accounts. You can group accounts together within a parent account, to see their overall buying trends. We have improved the Accounts dashboard, hierarchy overview, improved searchability and sorting, all of which surface better insights and analytics for your data.
Explore pages have gotten a boost in customization as well, through the introduction of description fields within the carousel layout and increased sorting options for topics. The Explore pages guide is customizable now as well, letting you choose whether or not it should appear collapsed or open when the visitor first sees the content, and its visual alignment.
We have added features that support scalable content assets and better information dissemination across all user roles. For better adoption and control of your Content Library, we have added new feedback messages for adding assets, to guide the user and prevent adding incomplete assets. And for View Only user roles, we have added Share icons within Campaign Tools, so that you can designate some content as shareable by all roles, and increase your brand stickiness.
Read on to find out about:
- Searching scheduled reports by the recipient.
- Searching external code by its name.
- Adding a funnel stage as a field merge within forms.
- Increasing folder name visibility with the introduction of hover text.
- Improved link for Knowledge Base, which opens in a new tab.
Guide alignment and display settings for Website Tools
NEW
With this release, you can configure the alignment for the guide to be on the right side or left side of the screen and can set the display to initially appear as collapsed or open.
Previously, when the content track guide appeared on the page, it always appeared on the bottom left of the screen in an open state and you had to manually collapse it. This can be a disrupting experience for you and your visitors especially if you are configuring any other widgets such as chatbot, which tends to be added to the same area in which the guide appears. This adds too much noise to the experience. To access this feature, follow these steps.
- Select Content Activation, then Website Tools.
- On the screen that appears, select a website you wish to edit and click Manage.
- In the next screen, ensure you have selected the Recommendations tab, and find the path you wish to edit. Click Edit.
- Here you can edit General Settings, Guide, and Publish Components. Click on Guide.

Display settings
- Alignment – these radio buttons let you choose Left or Right for the guide to display on your finished product.
- Expanded or Collapsed – Display is a field with the option to select between Expanded and Collapsed. This setting affects how the guide is first displayed to the visitor.
- Expand if Spent – this is an option for the visitor to collapse the guide (after trigger) when a certain time has been spent on the page.
- Expand if Scrolled – this is an option for the visitor to expand the guide (after trigger) when a certain scroll distance has been achieved based on the visitor’s behavior.
Description entry for each topic carousel
NEW
In an explore page, the carousel layout is often used when you have more content than can be effectively displayed in a grid. We have now added a space for you to enter a description for each topic section so you can increase the customization of your Explore pages to drive more engagement with the content people are looking for. You can label groups of content and sections.
To apply the carousel layout, follow these steps.
- Click on the Gear icon on the top right of the screen.
- From the menu that drops down, select Appearances.
- On the window that opens, select Campaign Tools, and then select Explore.
- On the window that opens, on the left side panel select the campaign you want to adjust.
- On the right side of the screen, scroll to the Body section and change Layout to Topic Carousel.
- Scroll down the screen and click Save Explore Settings (or Reset to cancel).

Managing the Topic Carousel
After you have selected the carousel configuration, to add names to the topic groups and sections, follow these instructions.
- On the main menu, select Content Activation, then select Campaign Tools, and finally select Explore.
- On the screen that opens, on the left panel select the Explore page folder that contains the content to which you applied the carousel layout.
- Select a track from the right panel. Its Explore page opens, and you can add titles and descriptions as you wish.
- For each element that you have edited, there is a corresponding Save button to save your changes.
- And don’t forget, you have icons along the top of the screen that let you edit, clone, delete, share, copy to clipboard, and preview.
- Preview the Explore page, and you can see the updated layout there.


Note: When you reorder the topics in Manage Topic Carousel, the topic’s description moves along with it. If the topic gets deleted, the topic’s description is also deleted.
Sorting assets in the Explore page topic carousel
NEW
Previously, the assets in the topic carousel of the Explore pages appeared in a random order, which makes it challenging if you are looking to prioritize the assets by date. This implementation lets you order the assets by ascending or descending order of the added by date, alphabetically and updated by date.
Sort the assets in the topic carousel by ascending or descending order of the ‘Added by date’ of the assets. Select the topics you wish to sort, then click on the new dropdown list to select the method of sorting.
- Added by Date ascending or descending
- Updated by Date ascending or descending
- Alphabetical (A to Z or Z to A): if the name of the asset starts with a number it should appear first in ascending order and at the end when descending is selected.
- Default – sorts by Added by Date ascending.
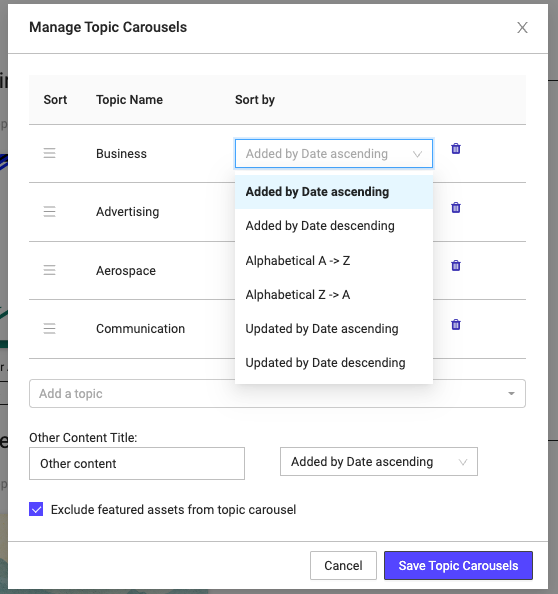
- If you delete the topic carousel, the entry is deleted from the carousel along with its contents.
- If you drag and drop to reorder the topics, the entire row moves.
Adding funnel stages value as a hidden field in forms
NEW
Starting with this release, the platform supports the funnel stages as a field merge in custom forms and external code. This implementation will help you from having to hardcode each funnel stage when you create/clone forms. You will be able to pass the funnel stages as a hidden field and the value (top, middle or bottom of funnel) that is associated with the asset will be passed into the field when the form is submitted. This information can help you with things like updating your lead scoring model based on funnel stages when a content threshold is met.
Funnel stage syntax: {{content.funnel_stages}}
Permission to share URL for view-only roles
NEW
Previously, the View Only role had access to the Preview button but not the Share icon. It’s important that all of your organization’s users can share promotional content with people outside your company, even for those roles who have View Only permission. This role can help increase brand and promotion visibility, and help increase the adoption of your organization’s campaigns.
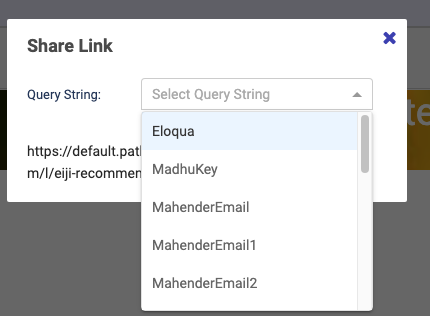
To share an Explore page
- Select Content Activation, then Campaign Tools, and finally Explore.
- Here you can see the Share icon next to the Analytics button. Click Share and the following popup appears. Select a Query String.
- From this dialog box you can also copy the URL address and open the track in a new tab.


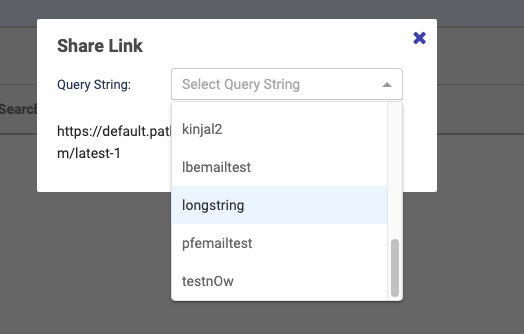
To share a Target Track
- Select Content Activation, then Campaign Tools, and finally Target.
- From the list that appears, select a track to view.
- You see the Share icon on the top right of the screen, beside the Track name.
- When you click the Share icon, the Share Link dialog box appears. Enter or select a Query string, and you can open the track in a new tab or copy the URL.

To share a Microsite
- Select Content Activation, then select Campaign Tools, and finally Microsite Builder.
- On the left panel in the window that appears, select the folder that contains the Microsite you wish to share.
- On the right side is a list of all the Microsites. Click on one to open it.
- On the Microsite Setup tab, you will see icons for copying to clipboard and sharing.
- When you click on the Share icon, the following popup appears.
- Select a Query string and click Copy to clipboard (copies the link) or Open in a new tab.
- Under the Landing Pages tab, you also see copy to clipboard and Share icons.
- When you click on the Share icon, the following popup appears.
- You may select Track Name, Overlay Starting Asset and Query String and click Copy to clipboard (copies the link) or Open in a new tab.


To share a VEX presentation
- Select Content Activation, and then select Virtual Events.
- On the screen that appears, select a folder from the left panel. On the right panel you see a list of events associated with that folder.
- Select an event. In the screen that opens, select the Sessions tab.
- Here you see the Share icon associated with that event.
- Select the Share icon to select the Query string, copy the URL or preview the session in a new tab.


Caution message when adding content assets
NEW
In the recent release, the content library architecture was updated to prevent users from saving any assets that are missing required fields. To help you and your users remember the mandatory fields that need to be completed for the asset to be uploaded into the content library, we have added a warning message that appears when the mandatory fields are left empty.
The message reads, ‘Denotes a mandatory field. The asset will not be saved if this field is empty.’

Furthermore, if you try to close the edit dialog box for an asset but have not saved it, you see the following warning message:
‘Changes not saved. This asset will not be added to the content library unless you fill in the required fields and click done. Do you want to continue?’
Within the warning message,
- Cancel takes the user back to the advanced edit and allows them to continue editing.
- Ok closes the advanced edit and the asset is not saved.

Search and Filter External Code
NEW
You can now filter and search through external code names via the search bar. Previously, you couldn’t search external code with filters. So if a user needed to find the created external code, they had to scroll through the entire list. This improvement makes it easier to search for the external code name in the search bar or using filters to get the list of all the code that fall under different locations. To refine the search further, you can choose a location.
- Enter the search term or any keywords associated with the external code you are looking for.
- Refine your search by adding a location.

Search Scheduled Reports by Recipient Email
IMPROVED
Previously, the search functionality in the Scheduled Reports section allowed you to search by report name only. Now you can see the list of scheduled reports when you enter keywords associated with a recipient’s email. This new search feature lets you check the list of reports a particular user in your organization is receiving.
To access this feature, follow these steps.
- On the main menu, select Path Analytics, and then click Scheduled Reports.
- From the list that appears, select a report.
- On this screen, click the Filters drop down list to see what filters you can use to drill down to the report you would like to see.
- Click Run (top right of the screen). Your results display on screen.


Visibility for long folder names
IMPROVED
We have added hover text so that whenever you hover over a folder that has a longer name, the full folder name is displayed to make it easier for you to navigate the platform and find what you are looking for. Previously, in the Content Library, if a folder name is long, you can see just the part of the name that fits within the display. In that case, the only way to view the folder name was to click on it and view the name on the navigation bar. This is especially challenging when you have multiple folders or subfolders with similar names.
Knowledge Base opens in a new tab
IMPROVED
We have configured the link to the Knowledge Base so that it opens in a new tab so that you won’t lose your place while using PathFactory. You’ll also notice this directs you to the new and improved KB we launched a few weeks back. We hope this improvement makes it easier for you to find all the answers you’re looking for. However, if you can’t, please don’t hesitate to reach out to support@pathfactory.com or your CSM for guidance.
To access the Knowledge Base, click on your login name on the top right of the screen, and then click Knowledge Base.

If you’d like to access the Knowledge Base within your browser, use this link: https://support.pathfactory.com/
Group most active accounts by parent group
NEW
- To access this dashboard, on the main menu click Revenue Intelligence, and then select Accounts.
- The accounts are grouped by Most Active, Least Active, New Accounts, My Watchlist, or Content Reach.
- In the grouped view the buying signals are aggregated across all children and grandchildren accounts.
Click on the parent account name you want to view to see the buying account specific dashboards (summary, buyers and topics of interest) aggregated to a parent level.

Account overview – navigate account hierarchy
NEW
You can view the overview of the account hierarchy to see how the accounts are linked, to analyze data for a particular account. On this screen you see the following information.
- To access this dashboard, on the main menu click Revenue Intelligence, and then Accounts.
- From the list that appears, select an account to view.
- On the top left of the screen, click the hierarchy icon.
- The account details are displayed.


As you can see, we have added many improvements to this release that extend your branding and increase the value of your investment. The new feedback messages for the content asset library, the hover text, the report search filters, and sharing icons help others in your organization use PathFactory without sacrificing your control over your content. As always, contact your CSM if you have any questions.
Views: 74