It’s a brand new year, and we have added new features to make your PathFactory investment more user friendly and customizable. All of the improved features you see here are designed to make your PathFactory instance easier to use and more adaptable to your specific market needs.
Read below to find out more about:
- Placement of your Concierge in Website Tools
- Using Single Sign On or email login for your users
- Improvements for Virtual Events interface
- More specific sharing of Recommend tracks
Website Tools
Customize placement of concierge
For a refresher on Concierge functions, click here.
This new feature provides you with:
- Flexibility in how and where the concierge can be injected into your website.
You can now specify where the concierge is placed, based on the defined target element. You can place Concierge BEFORE or AFTER a given element. For example, if you want to place Concierge before the footer, for example, you can now do that.
For scalability, you can place Concierge across many website pages at once. Consider a website with 1000 pages, but with a consistent footer element. Before, you would have to edit 1000 pages with a DIV to place Concierge on that page. Now, you can just select the footer element and specify that the Concierge resides before the footer element.
To use this new feature, follow these steps.
- On the main menu bar, click Content Activation, and then select Website Tools.

- Select a website you want to edit, and click its associated Manage button.
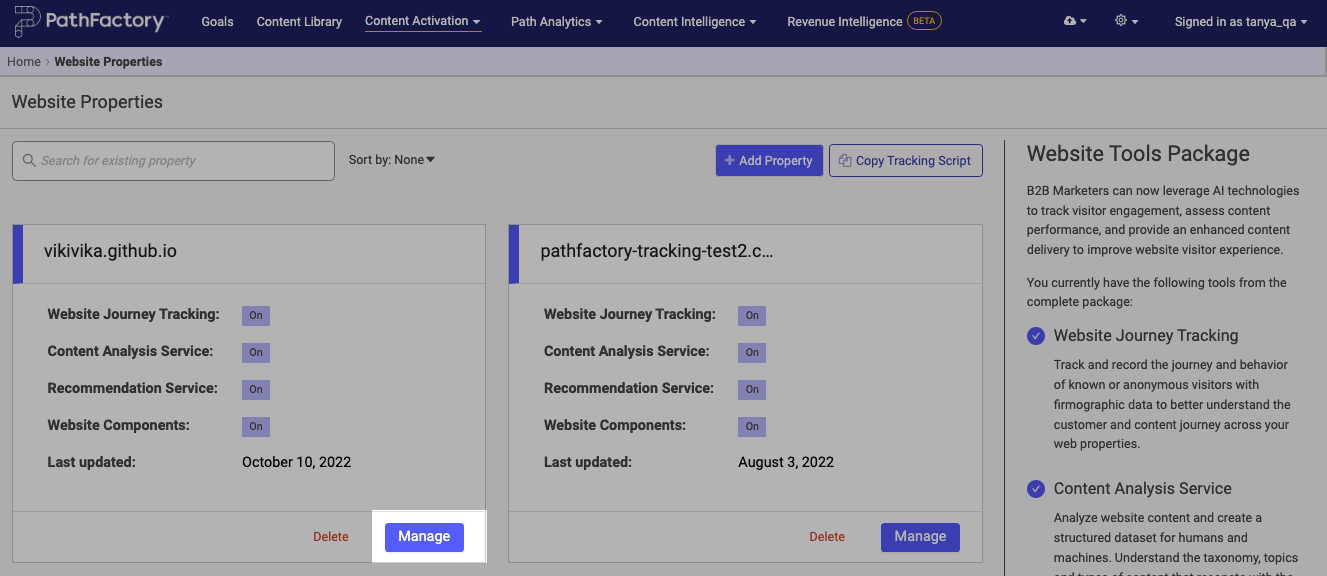
- On the next screen, beside the website you want to edit, click its Edit link.

- On the next page, in the General Settings section, ensure the Concierge checkbox is selected.

- Scroll further down to the Concierge section, and then configure your concierge settings.

- In the Location field, make a selection from the following options:
- After
- Before
- Inside
Note: Previously, the only option available was Inside.
- When you are finished, click Save. You are returned to the Recommendations tab, Website Components for your chosen website. Ensure the toggle for Concierge is turned on (as shown below).

8. Time to check out your new concierge! Load your website to ensure it’s displayed correctly.
Single Sign On
Sign in with email and password option when Single Sign On (SSO) is configured
With this implementation, you now have the option to enable or disable email and password login for your users when SSO has been configured for your organization.
Being able to disable email and password login helps reduce confusion for the users by allowing them to see either SSO or the email/password option. This also adds additional governance to your instance such that only users that are associated with your organization and have an account with PathFactory can access your PathFactory instance. By default SSO is enabled.
To use this feature, follow these steps.
- Click on your login name and then select Organization Settings.

- Select the Single Sign On tab.
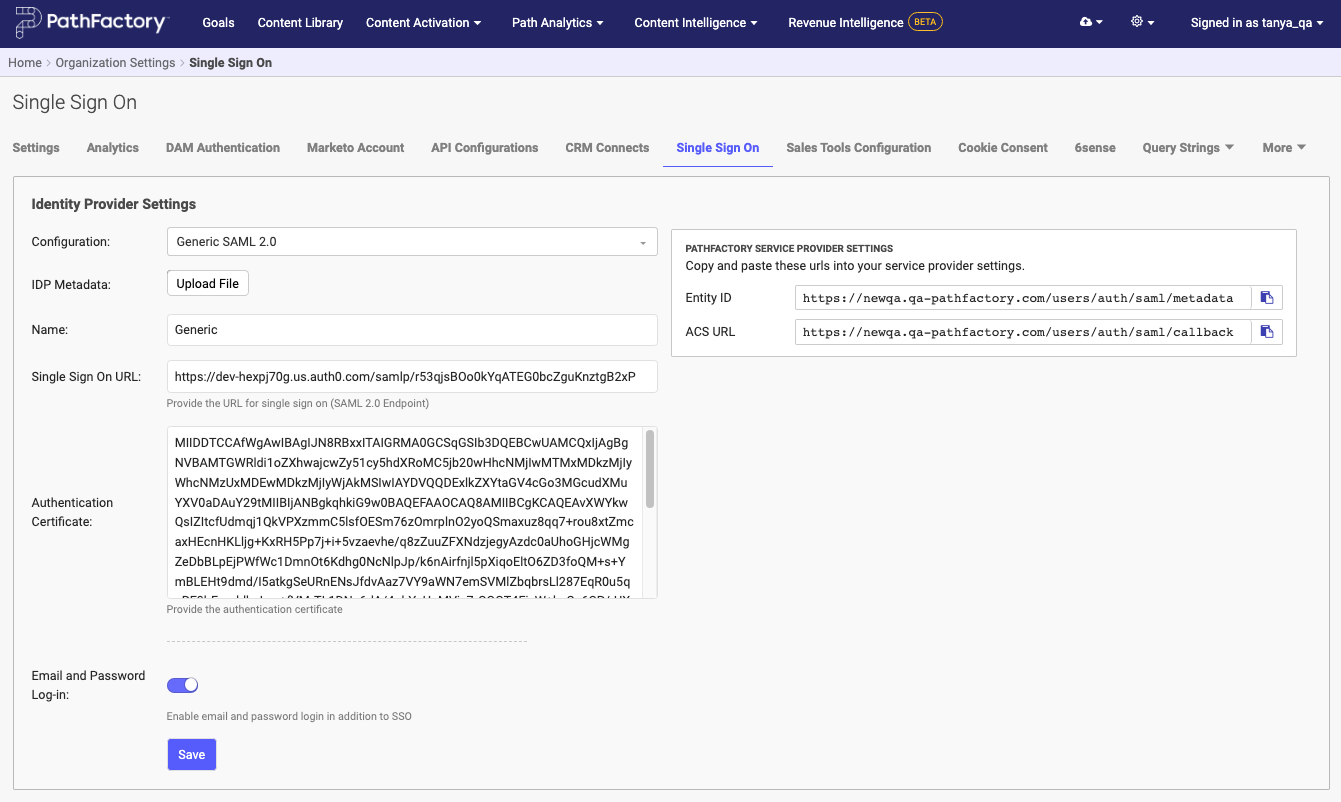
- If you have enabled SSO at your organization, you can decide whether or not to also display a login option for using an email and password. If you want to allow this option, ensure the toggle is turned on (as shown below).

Note: If you do not have SSO enabled for your PathFactory instance, this toggle does not appear.
4. Click Save.
5. When you log on next time to your PathFactory instance, you see something like this.

Notice at the bottom of the menu there is an option for using an email and password as login credentials, or your user can click the Single Sign On button to log in that way. This functionality is compatible with G-suite, onelogin, okta and SAML.
Below is an example of a login menu that has Single Sign On option only.

Virtual Events
Customize time zone naming toggle in Virtual Events scheduling
We recently released a feature that lets your Virtual Event audience customize their view of a planned Virtual Experience session, to see the schedule in their local time zone via a toggle. Previously the label for this toggle was only available in English. This release provides you with the option to add translation for this toggle especially if the session is configured in language other than English thereby providing visitors a seamless experience . To use this new feature, follow the steps below.
Note: Even if you create sessions in a language other than English, the toggle label is still displayed in English. You can manually change the displayed text there to match the language you want to display.
- On the main menu bar, click the Gear icon, and then select Languages.
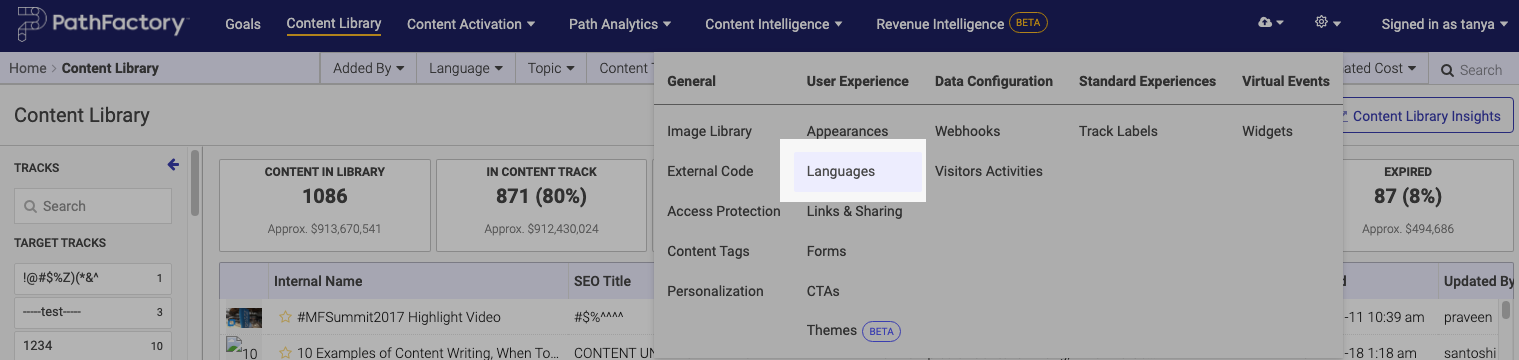
- Select the Virtual Events tab.

- Now you see a new field for naming the time zone toggle.

- You can leave this text as is, or you can enter the label you want. When you are finished, scroll down and click Save Virtual Event Settings.
Let’s test it!
- On the main menu bar, click Content Activation and then select Virtual Events.
- Open the Virtual Event you want to configure.

- Select a session within that event. Make sure the session type is set to Live and Public (or edit the session to have this configuration).

- Add a date and time for your session, and select a time zone from the dropdown list.

- Scroll to the bottom of the page and click Save. You see a save confirmation message, or you see the errors you need to correct before you are able to save the event.
- Open the session that you just configured. Open the session by clicking on its share link and opening in a new tab.
- On the event sign up page, you see a toggle for the user to display the session time in their own time zone, using the name you added.
Below is an example of a customized toggle name.

Configure links and sharing placement under session videos
You now have the option to place your sharing links in the header, as well as below the video.
To use this feature, follow these steps.
- Navigate to your Virtual Events.
- From the list of Virtual Events, select the one you wish to edit. Select a session within the Virtual Event and click its associated Configure link.
- On the Session Details tab, scroll down to the Links and Sharing section.

- Select the toggle to enable it. The interface then changes to reveal layout options for your sharing links.
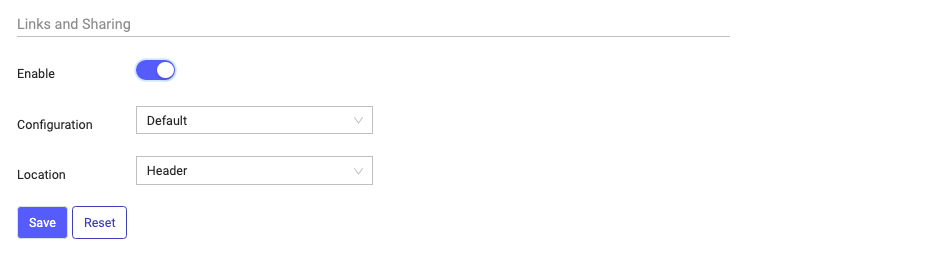
- On the dropdown lists, you can select for Configuration – use a preset appearance from the list. And you may also select a Location – Header (default) or Below Video.

- If you select Below the Video, you can add a description as well. Here’s how that will look in the finished product.

Content Activation – Recommend Tracks
Pre-filter by topics when generating a share link for a Recommend track
You can now use the share link generator to create a link to a Recommend track that is already pre-filtered to a specific topic.
Pre-filtered topics are appended as a topic query parameter in the share link. When you generate a shareable link with pre-filtered topic values, the link opens the Recommend track with the filtered topic values.
Previously, if you want to share a link with a pre-filtered topic parameter applied, you have to open the Recommend track, apply the filters manually and then copy the share link, manually append the topic query parameter similar to lb-email, and then share with the user. That process has a high risk of resulting in manual errors that would have an impact on reporting.
To use this new feature, follow these steps.
- Navigate to your Recommend tracks.

- Select a track to share.

Note: You must have Topic sidebar toggle enabled to use this feature.
- Click the Share button at the bottom right of the screen.
- A popup menu appears. Here you select a topic filter from the dropdown list.

- Your Recommend tracks will be filtered according to the topic you choose.
Views: 81