This article explains how to set up and use the native integration between the Aprimo digital asset management system (DAM) and PathFactory content library to allow for the seamless import of Aprimo assets, including their tagging and governance rules.
Using the Aprimo integration provides the following benefits:
- Creates direct access to Aprimo content libraries from within the PathFactory Content Library interface.
- Carries over the tagging you have set up for Aprimo assets imported to the PathFactory Content Library.
- Avoids duplicate files when you update and then upload Aprimo assets to PathFactory Content Library, because PathFactory overwrites the older files.
- For updated Aprimo assets, PathFactory maintains the asset’s original content tags and placement in the content tracks you had previously set up for the assets.
To use the Aprimo import process, you must first contact your PathFactory CSM so they can turn on this service for your PathFactory instance.
How to Set Up the Connection Between Aprimo and PathFactory
Note: These instructions are meant for your organization’s System Administrator.
We have added CDN (Content Delivery Network), otherwise known as a Public link, to the Aprimo connection functionality. Previously, the Aprimo import process supported image files and PDF files only. By allowing public links, we are now able to support the importation of video and audio files.
Note: If your organization doesn’t have Public link enabled, your content will continue to use the Record ID method where PathFactory will download and host the content in our CDN. However, this method does not support video or audio files.
The advantages of adding a CDN link are as follows:
- Reduce PathFactory CDN capacity requirements as you no longer need to download the content and then host it in PathFactory CDN.
- Each content asset is tagged with a content ID and source URL to prevent duplication.
For a graphical overview of the import process, see the image below.

Read below for detailed instructions.
Enter DAM Authentication Information
To import assets from Aprimo, you need to first configure a connection with Aprimo. By connecting your Aprimo instance to PathFactory, you are also ensuring the assets that are imported into the Content Library stay in sync with your DAM. Follow the steps below.
- On the main PathFactory menu, click on your login name (top right) and then select Organization settings.
- On the screen that appears, select the DAM Authentication tab.
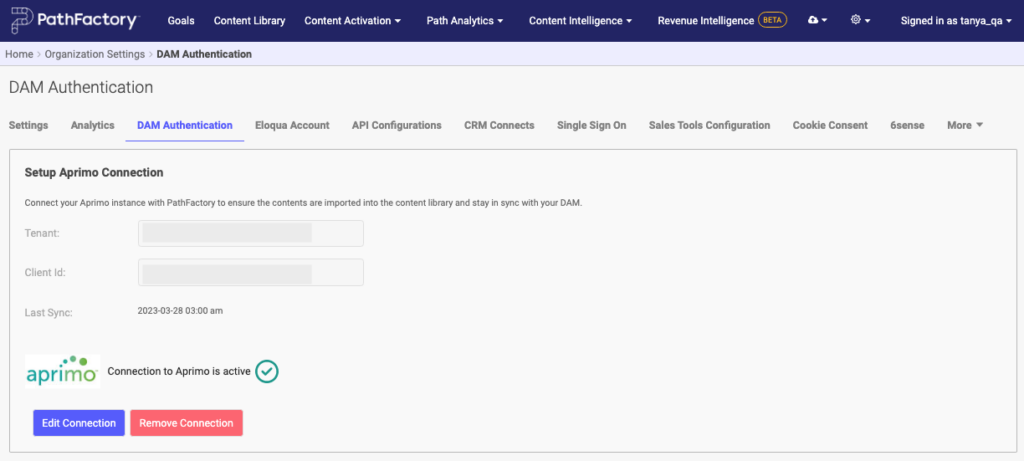
3. Input Tenant and Client ID.
Note: If you have already set up your Aprimo connection, you’ll notice on this tab a message that says the connection is active.
4. To proceed with adding a public link, click Edit Connection.
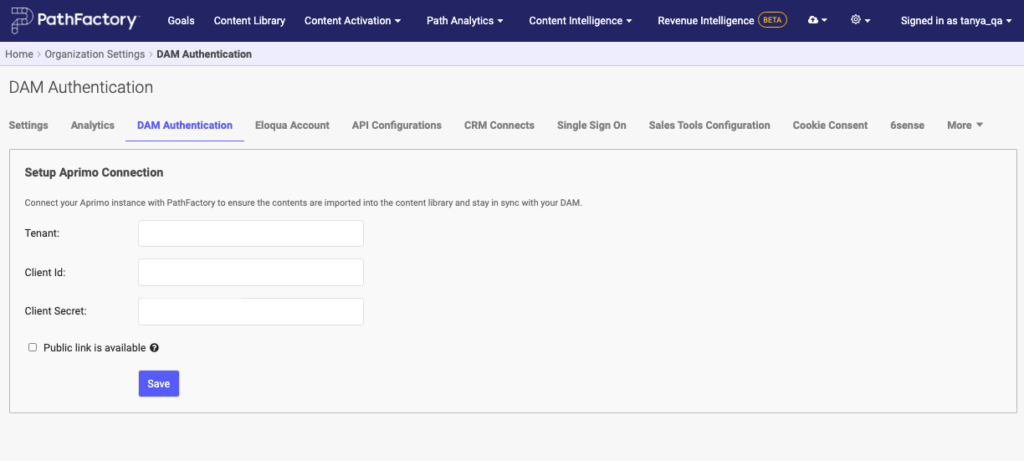
5. Enter your Client Secret.
6. Click on the checkbox labeled Public link is available, to activate it. Click Save. You are now ready to map the fields.
Map the Aprimo Fields to PathFactory Fields
Set up mapping between PathFactory and Aprimo fields to ensure correct values are populated in the respective fields in the content library (during both the import and sync process).
- Navigate to Platform Settings (gear icon) and click DAM Fields.

- On the screen that appears, enter the information to set up the framework for mapping. In the Destination column, add the Aprimo fields that match up with the PathFactory fields. Make sure all of the fields are properly mapped.
Note: You may still edit the Destination fields after you import the Aprimo assets.

If you have set up any tags to be “required” or any fields are mandatory, you must ensure proper mapping has been done and values are mapped to PathFactory fields, so that the assets are imported successfully. Similar to using a CSV file, if any values are missing then the content will not be imported.
- Click Save when you are finished.
- Back on the main menu, click the gear icon (top right) and then select Content Tags.

- On the screen that appears, select the Content Types tab. This tab is where you must enter the information that you had set up for the Aprimo assets, such as content types, funnel stages, estimated cost of each asset, content engagement score, and engagement time threshold. You may add more content types here by clicking the +Add Content Type button. To edit an existing content type, hover your mouse over the one you want to adjust, and then click the pencil icon that appears.

Note: The Funnel Stage tag will be recognized by PathFactory only if the corresponding Aprimo asset is tagged by one of the three options below. Otherwise, PathFactory will not be able to import this Aprimo asset and you will receive an import error message.
- Top of funnel
- Middle of funnel
- Bottom of funnel
How to Import Aprimo Content Into PathFactory
These instructions describe how to upload assets from Aprimo to PathFactory, whether you are uploading multiple assets or only one.
Note: If the content in PathFactory is expired, when you import an updated Aprimo asset the content is updated but remains expired. You can adjust this expiration manually after the import has completed.
- On the main menu bar, click Content Library. On the screen that opens, click + Add Content.

- On the popup window, click the tab named DAM Import.

- On the DAM Import tab, click Choose Content.
Note: Governance and permissions are handled by Aprimo. For example, if an Aprimo asset is restricted to being viewed by certain roles within the Aprimo asset library, this restriction persists after import.
- You will be automatically directed to your Aprimo login.

- Once you have logged in, you will be directed to select the Aprimo content you wish to add.

- You can use the filtering options on the left side to drill down to the assets you want. When you are finished choosing the assets to upload, click Select Assets.
- You will be automatically returned to the PathFactory application. On the Add Content popup, click Done to begin the process.

- When the import process is complete, you receive one of two emails:
Email 1 confirms successful import of assets and a list of how many records were uploaded to the PathFactory content library.
Email 2 is a notification that an import was not successful with a list of the errors and their details, so that you can correct them and try the import again.
You’ll notice an attachment on this email. When you open it, you see the details of why the import failed. See below for an example.


- Once the import is successful with zero errors, you may open the content in PathFactory and modify details such as category, content tags, and topic tags.
How to Map Existing Aprimo Assets in PathFactory
When you update your Aprimo assets, you don’t need to be concerned about duplicate files in the PathFactory Content Library. Whatever values have been entered on the Aprimo side will be reflected in PathFactory.
To ensure there are never any duplicate assets, every 24 hours PathFactory runs a scheduled batch job to scan for duplicate files (the updated Aprimo assets) and then deletes the older files. That is why the PathFactory Content ID must match the Aprimo Asset ID, so that PathFactory recognizes it and automatically performs the update for the given content in the Content Library.
Existing PathFactory clients who are already using Aprimo and want to use our new import process to update Aprimo assets going forward must complete these steps.
Note: For new Aprimo assets that do not already reside in the PathFactory Content Library, you do not need to perform this procedure.
- In the PathFactory Content Library, you will notice a link for downloading the CSV file in the bottom right corner of the screen.

- Click Download CSV, and then open the resulting file.

Along the top of each column, you’ll notice the headings that contain all the attributes, tagging, URLand content ID for the PathFactory content.
- Within this file, you can scroll over to the right and see the column that contains the Content IDs of the PathFactory contents.

- Now you must add a column in this file that lists the corresponding Aprimo record ID (available in your Aprimo asset database).
- When you have added all of that information, contact your PathFactory CSM. Send them your CSV file and they will pass it to the PathFactory engineering team to complete the mapping in PathFactory.
Note: If you add an expired Aprimo asset to the PathFactory Content Library, that asset remains expired in PathFactory unless you manually change it in the PathFactory Content Library.
How to View Aprimo Content Assets Within PathFactory
To see which assets in your PathFactory Content Library are from Aprimo, follow these steps.
- Open PathFactory and go to your Content Library. There you see a list of all the content assets you have in your PathFactory Content Library. Assets that have been imported from your Aprimo DAM have an Aprimo label beside its internal name, as shown below.
Note: If you are not a PathFactory user, you can view your content assets within Aprimo to see which assets have been uploaded to PathFactory.
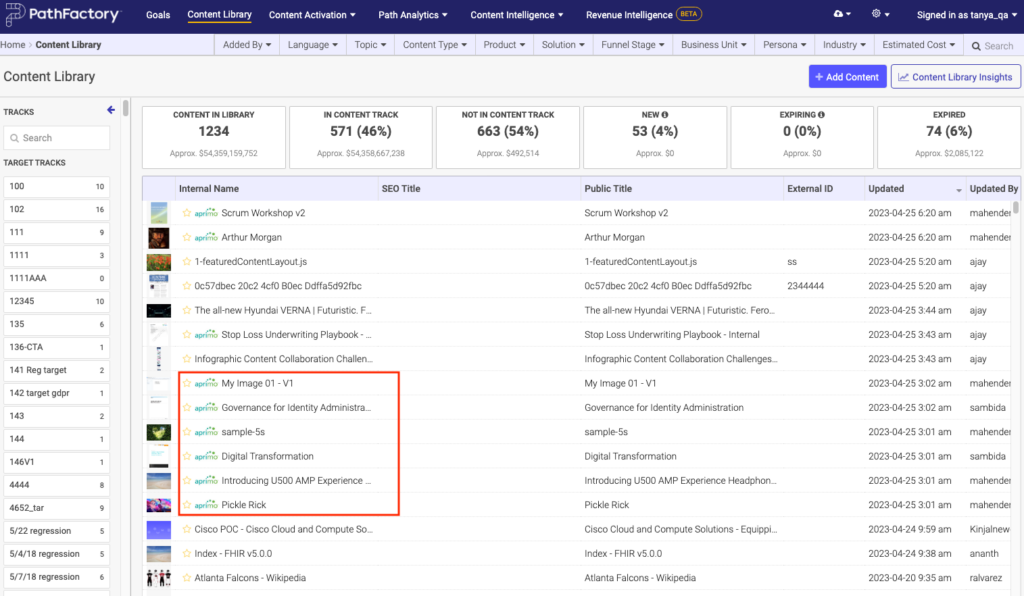
- You can click on an Aprimo labeled asset to see its record ID.
Enhanced Content Data Insights for Aprimo DAM Assets Used in PathFactory
PathFactory and Aprimo have continued to collaborate to build a bi-directional integration, which allows Aprimo DAM customers to receive and view content performance data captured through audience engagement with Aprimo DAM assets within digital experiences in PathFactory.
This new feature allows Aprimo users, especially the users that don’t have PathFactory accounts, to access insights about how their content is performing.
The following consumption data is displayed for each Aprimo asset.
- Engagement time over the last 90 days
- Average view time over the last 90 days
- Number of pages views over the last 90 days
- Content Dashboard URL
- Last time the asset was synched with PathFactory
This feature is useful for updating content to be more current or replacing content that is underperforming in a campaign with something relevant and impactful.
Users with PathFactory accounts can click on the content dashboard URL and get detailed insight into the performance of any piece of content.
How to Access Content Insight Dashboard for Aprimo Assets
Using the following steps, you can directly access the Content Insights dashboard to view your assets’ analytic data. This simplified navigation saves you from having to navigate through PathFactory to PathAnalytics and find the correct dashboard and filtering to see your content assets’ consumption data.
We provide a link directly to the Content Insight Dashboard so you can more easily view your Aprimo assets’ analytics.
- In your Aprimo asset under PathFactory Content Insight, there is a field called Content Dashboard, as shown in the screen capture below in the red rectangle.
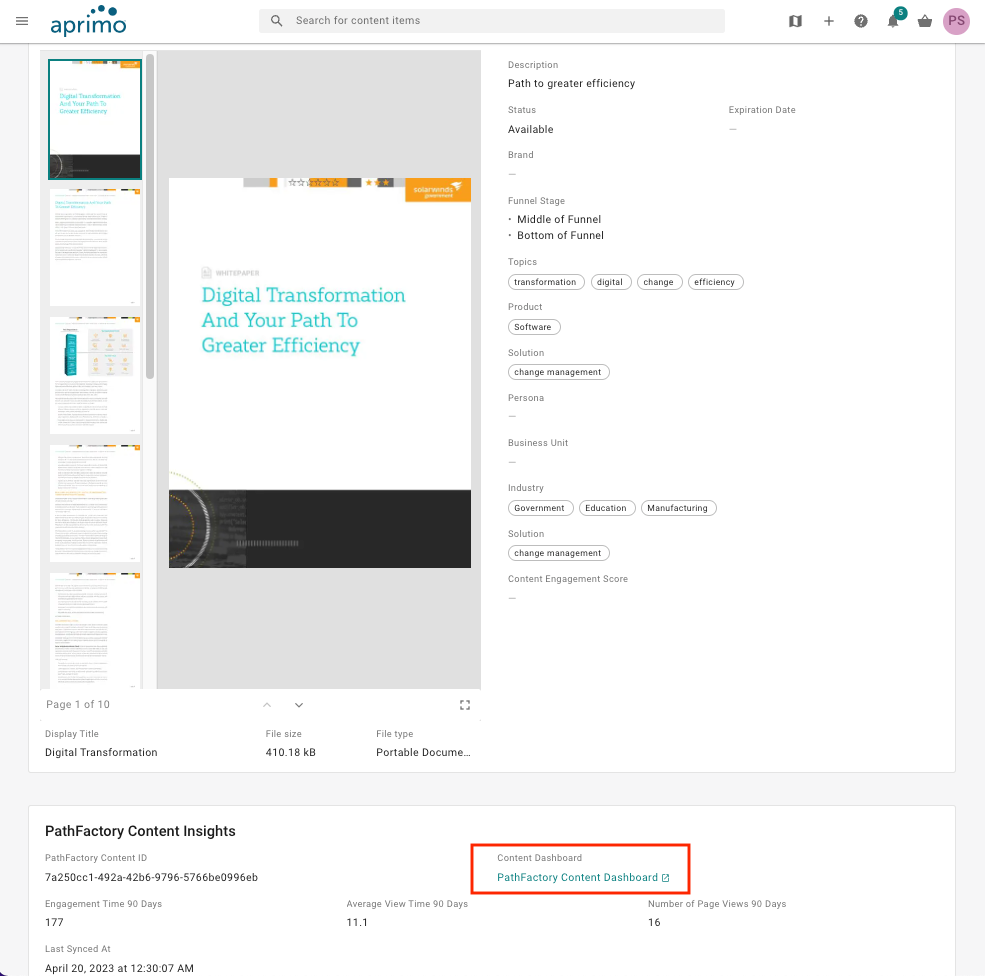
- This field holds the link for the Path Analytics dashboard associated with a content asset.
- When you click on the link, you are taken to the PathFactory login page.
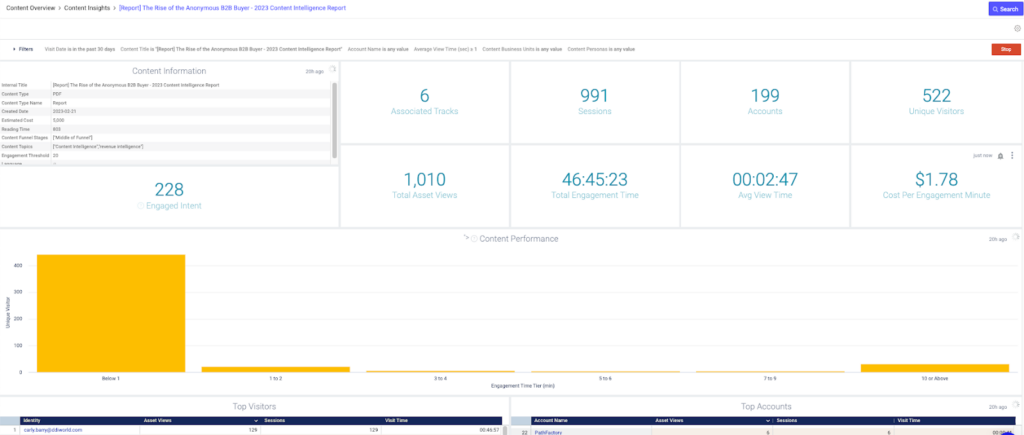
- Upon logging in, you are taken directly to the Content Insights dashboard, which contains all of the analytics for your Aprimo asset consumption data. Below is an example of a Content Intelligence report on the Content Insights dashboard.
- Engagement time over the last 90 days
- Average view time over the last 90 days
- Number of pages views over the last 90 days
- Last synched with PathFactory
Content Insights Reports
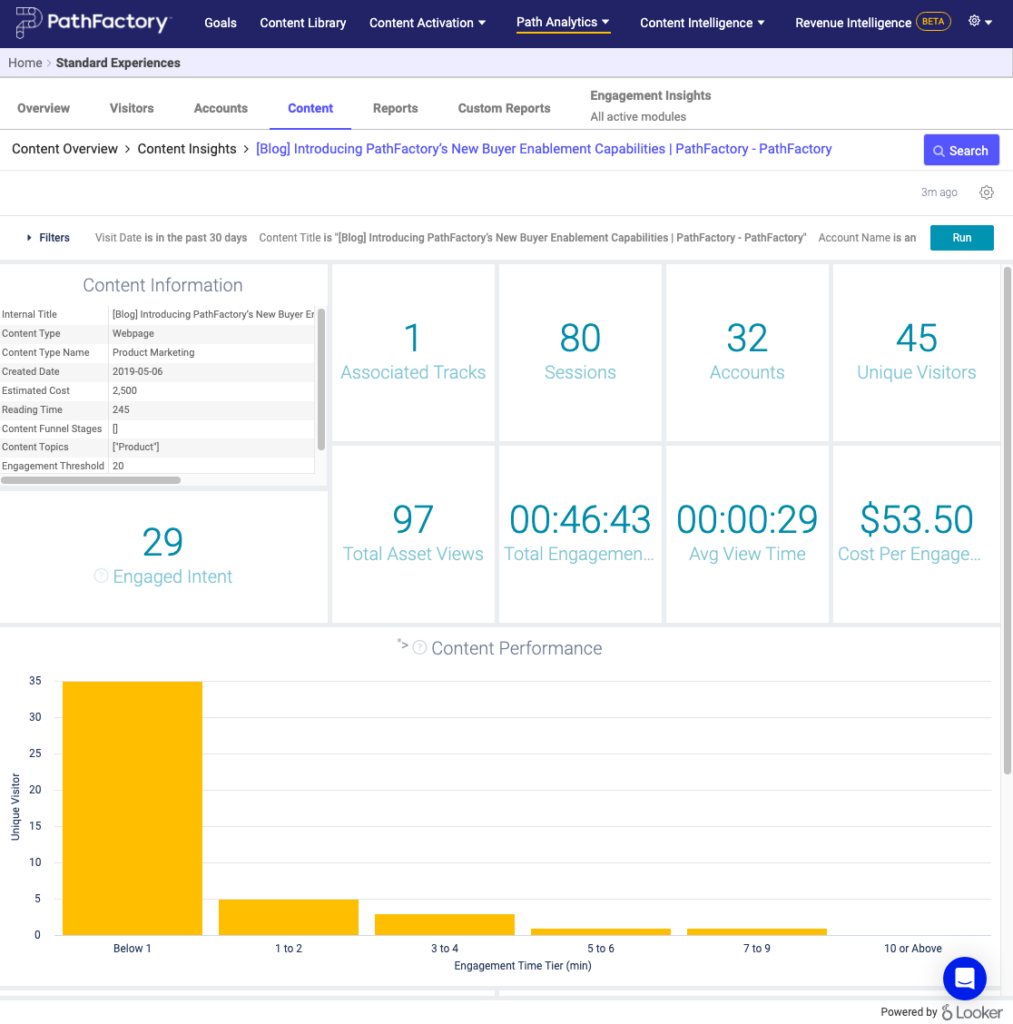
To view the consumption data for all of your Aprimo assets in a report, follow these steps.
- On the PathFactory main navigation bar, click Path Analytics, and then select Standard Experiences.
- Next, select the Content tab. Below is an example of a consumption report. You’ll notice there are filters available to view the data however you want by selecting different filters.
Views: 128