VEX encourages audience engagement and participation by allowing widgets to appear in-session in the bottom right corner of any session regardless of whether the session is live or on-demand. You can bring in any widget you wish into any VEX session, and/or use the included chat widget. The purpose of this article is to document the features of the included chat widget.
The included Chat widget is a turnkey chat solution with a modern interface that mimics the look and feel of other popular chat applications. It features emojis, reactions, threading (useful for Q&A), polling, and more! Chat within VEX is inherently linked to sessions. You cannot currently use this chat widget on any VEX Landing Pages or the Event Home page.
Setting up Chat for a Session
To configure chat for a session, follow these steps.
- On the main menu, click Content Activation, and then click Virtual Events.
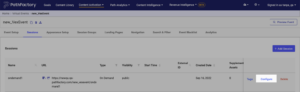
- A list of Virtual Events appears. Select one and then select the Sessions tab.
- Next to the individual session, click Configure.
- On the screen that appears, click the Widgets tab.
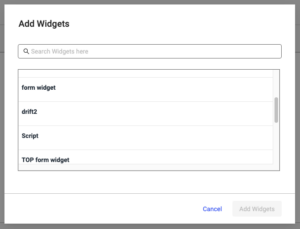
- From there, click on the + Add Widgets button. This action launches a new modal pop-up window where you’ll see a list view of all of the 3rd party widgets you’ve added to your PathFactory environment and the included chat widget which shows up in the list as “Chat”.
- On the popup that appears, select the widget you want to add.
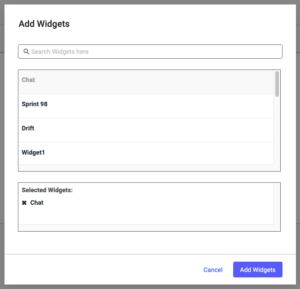
- Select the widgets you want, and then click Add Widgets.
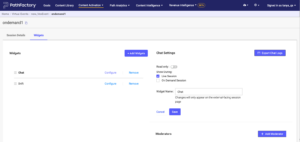
- You’ll know you’ve successfully added chat to a session when you see it in the Widget list. To configure chat click the “Configure” button and Chat Settings appear on the right side of the screen. Now you can fine tune the customization. Beside the widget, click Configure.
- Happy with your settings? Click Save. Want to cancel without saving? Click Cancel.
- After you exit this screen you are returned to the main configuration page for that session. Click Save or Reset to finish.
- To return to the list of sessions, click the breadcrumb at the top of the screen.

After the VEX session
Once your session has taken place you may wish to export a log of all chat messages. You can do so by clicking the Export Chat Logs button in the top right corner of the Chat Settings menu. This automatically sends an email containing the Chat Logs as an attached .csv file to the email address of the user who is currently logged-in.
You’ll notice a Read Only toggle in Chat Settings. Toggling this on prevents attendees from being able to participate in chat if they wish to do so at any point in your session, but in doing so an attendee can still see the chat widget and past messages while they are in the session.
There are two important reasons you may wish to use this feature:
- If you are moderating the chat and the moderator is available for a period of time and you don’t want to leave the chat unmoderated during that time (e.g. a 5 hour session with a one hour lunch break in the middle).
- If you only want to use the chat widget to contain messages from the moderator (e.g. announcements), and don’t want attendees to be a part of a group chat at all.
The Show During: section allows you to control whether the chat widget is shown when the session is Live, On-Demand, either or both.
Widget Name allows you to change the name of the tab the chat widget appears on to your event attendee. By default this is “Chat” as it appears in the first screenshot in this article, but can be renamed as you wish using this text box.
When making changes, be sure to click the Save button before navigating away.
Adding Moderators
The next step to consider in setting up Chat for your session is adding moderators. Moderators are helpful to have because they can delete the chat messages of attendees, create polls, pin messages, and add announcements. Chat moderators can also gain access to a session before the session start time (unlike regular attendees who wait in a waiting room until the countdown timer is finished). Moderators are not a requirement for Session Chat, but most PathFactory customers take advantage of this functionality for the aforementioned reasons. To add moderator(s) to a given session’s chat, when configuring a session navigate to the Widgets tab.
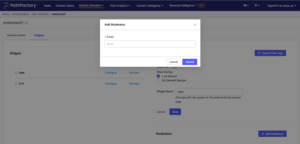
Then, select Configure beside the Chat widget in the list. In the new pane which appears on the right side of the screen, in the Moderators section click on + Add Moderator.
You’ll then see a modal pop-up window where you can enter the email address(es) of your session moderators.
Note: Moderators don’t need to have a log-in to your PathFactory environment. Currently, we don’t support adding more than 1 email address at a time, so you must add moderators one at a time.
Once you have added the email addresses of your moderators you’ll notice text next to each one in the list which allows you to edit the moderator email address that was input or remove the moderator. If you happen to accidentally remove a moderator you wanted to keep, no worries! It is quite easy to add them again, by following the instructions above to re-add them.
For your moderator to enter moderator view, first ensure they’ve registered for the event using the exact same email address you entered in the moderator list above, or if you’re not using VEX for registration ensure they’re accessing the event using the a URL with a query string which identifies them with the exact same email addresses shown in the moderator list as shown above. For more information on how to identify your attendees see Registration and Sending Registrants to your VEX Event.
With the moderator in the event, they should then navigate to a session they are a moderator of and if they are a moderator they should see a button at the top of the chat panel which says Open in Moderator View.
On clicking this button a new tab opens up that shows the moderator the full listing of all chats which they are a moderator of, allowing them to easily monitor the chat of several different sessions. In the chat of each session they have extra functionality over and above what standard attendees can do (see sections below).
Room Configurations and Announcements
To change chat room configurations and make announcements, head over to the Room Info (see below).

From here click ‘edit’ at the bottom of the Room Info right side pane.

You’ll notice you can now edit a few key attributes of the chat:
- Image: This is not visible to attendees and should only be used if moderators need a quick reference to differentiate between multiple chats.
- Name: You’ll notice the name used for each chat is a string of letters and numbers. This is a unique identifier we generate for the chat of each session and the first few letters are based on the name of the session to help you know which chat belongs to which session. Note that as of the writing of this article we don’t support changing the name of each chat. If you do change the name of the chat in this edit pane it can cause errors for attendees, so please refrain from doing so.
- Description: Changing the chat description only shows up as an in-line notification by attendees and thus is not frequently used by PathFactory VEX customers.

- Topic: Changing the chat topic only shows up as an in-line notification by attendees and thus is not frequently used by PathFactory VEX customers.

- Announcement: Setting an announcement in chat is useful as it displays as a persistent message at the top of the chat pane for attendees of a session.For attendees who are in a session at the time an announcement is saved, the page needs to be reloaded to see the announcement. If it’s urgent, it’s a good idea to also add the announcement message as a message in the chat for all active participants to see as well. Anyone new who enters that session sees the announcement until it’s removed. This is an example of how an announcement looks to an attendee:

To remove the announcement, simply follow all the same steps but instead of adding a message, delete your announcement and save. Announcements cannot be automatically removed.
- Hide System Messages: Best practice is for the main moderator to enable this and select the first 5 of the options, as this reduces chat clutter.

Ignoring, Muting, and Removing Chat Participants
The members page allows you to see a list of chat participants and to take action on individual participants. In moderator view, start by clicking the 3-person icon in the top right corner (see below).

You then see a new right side pane with a list of all chat participants and a search box. When hovering your cursor on top of a chat participant you notice a handle consisting of three vertical dots. Clicking on this handle provides three options for how you can take action on a chat participant. You can disregard the Direct Message option as it is currently not active.

- Ignore: this keeps the user in the room but any and all messages they would send are sent as blank
- Mute User: this disables a user from engaging in the chat room
- Remove from room: this removes the user from the chat room
Polling
As a moderator, you can create polls within chat to increase audience engagement. In order to do this, stay in the moderator view and type ‘/poll’ in the chat box to start building your poll.

Then, hit the return key or the Spacebar, then hit the return key. This launches a pop-up modal window where you can create your question, create possible answers, and decide whether a participant can choose just one or multiple options.

In addition, there is an option which hides the usernames which answered the poll. To do so select ‘Confidential Vote. By selecting this option the poll shows only the number of votes for each option, but not who voted for which one. ‘Open Vote’ (default option) allows usernames to be displayed when a user votes.

Open Vote Example:

Confidential Vote Example:

To close the poll, as a moderator you must select the 3-dots on the top right corner of the poll and select ‘Finish Poll’

Audience Participation in Chat
As an audience member attending a session, Chat shows up in the bottom right corner of the session in its own panel. Audience members do not need to separately register for chat. There are several ways audience members can interact with other attendees, moderators and presenters in chat.
- Send Message: Simply send a message/comment/question in the attendee group chat for the session.
- Quote: allows one to respond to another comment

- Add reaction: to create a more human experience, there is also an opportunity to react to comments and add an emotion that’s been displayed using the Emoji icon.

Exporting Your Chat Log
After the session ends, you can download a chat log for each session as a .csv file. Start by entering the configuration for the Session you wish to receive a chat log of. In the ‘Widgets’ tab of that particular session’s configuration screen click the ‘Configure’ button beside chat, then click the `Export Chat Logs` button in the top right corner of the screen. You then receive an email with an attached .csv file containing that Session’s chat.

This email comes from ‘support@pathfactory.com’ so please check your spam folder if you do not receive it within the first 5 minutes after clicking `Export Chat Logs`. This email is sent to your registered email with PathFactory (the one you use to log into the PathFactory authoring environment). Below is the format of the email:

Views: 83