Release S is here! In a continuing effort to make PathFactory easier to use, we have made some improvements and some additions to our functionality.
- Upload many users at once to save time.
- Apply unique tracking IDs for Microsites and Virtual Events, so you can more easily analyze their effectiveness and reach.
- Scheduled reports filters stay the way you have set them unless you decide to change them. This continuity lets you quickly run your reports without having to check and reset the filters.
Add or edit multiple users at once
Previous to this release, the PathFactory platform did not provide administrators with an option to add multiple users at once. As you can imagine, if you’re looking to onboard a large group of people, this process could become pretty tedious! This improvement helps to remove this barrier by providing you with the ability to bulk upload a list of users for your organization (as well as bulk edit your existing users).
To see this functionality in action, follow these steps.
- Navigate to User Management.

2. Click +Add User.
3. A popup window opens, giving you two options for adding a user: Single User or CSV Upload.
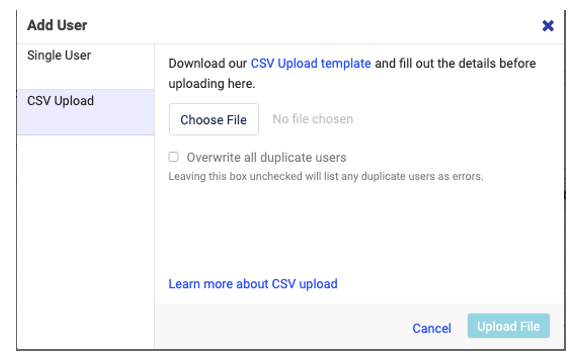
4. Navigate to the CSV Upload tab to perform bulk upload of the users in your organization.
Note: Use the sample CSV template to create your upload file.
5. The fields in the CSV upload include:
- Username
- Name
- User Role
- Active
- SSO
Note: Email, Username, and User Roles are mandatory fields. You can enter Yes/No value only for Active and SSO fields. The value applied in SSO will be considered only if SSO has been enabled for your platform under Organization Settings. Ensure proper entries are made in the fields for successful upload of your user list.
6. When the CSV upload has been completed, the user receives a confirmation email.
This email contains the following information.
- the task has been completed
- the number of success
- the number of failures
- CSV download showing why the upload failed (if applicable).

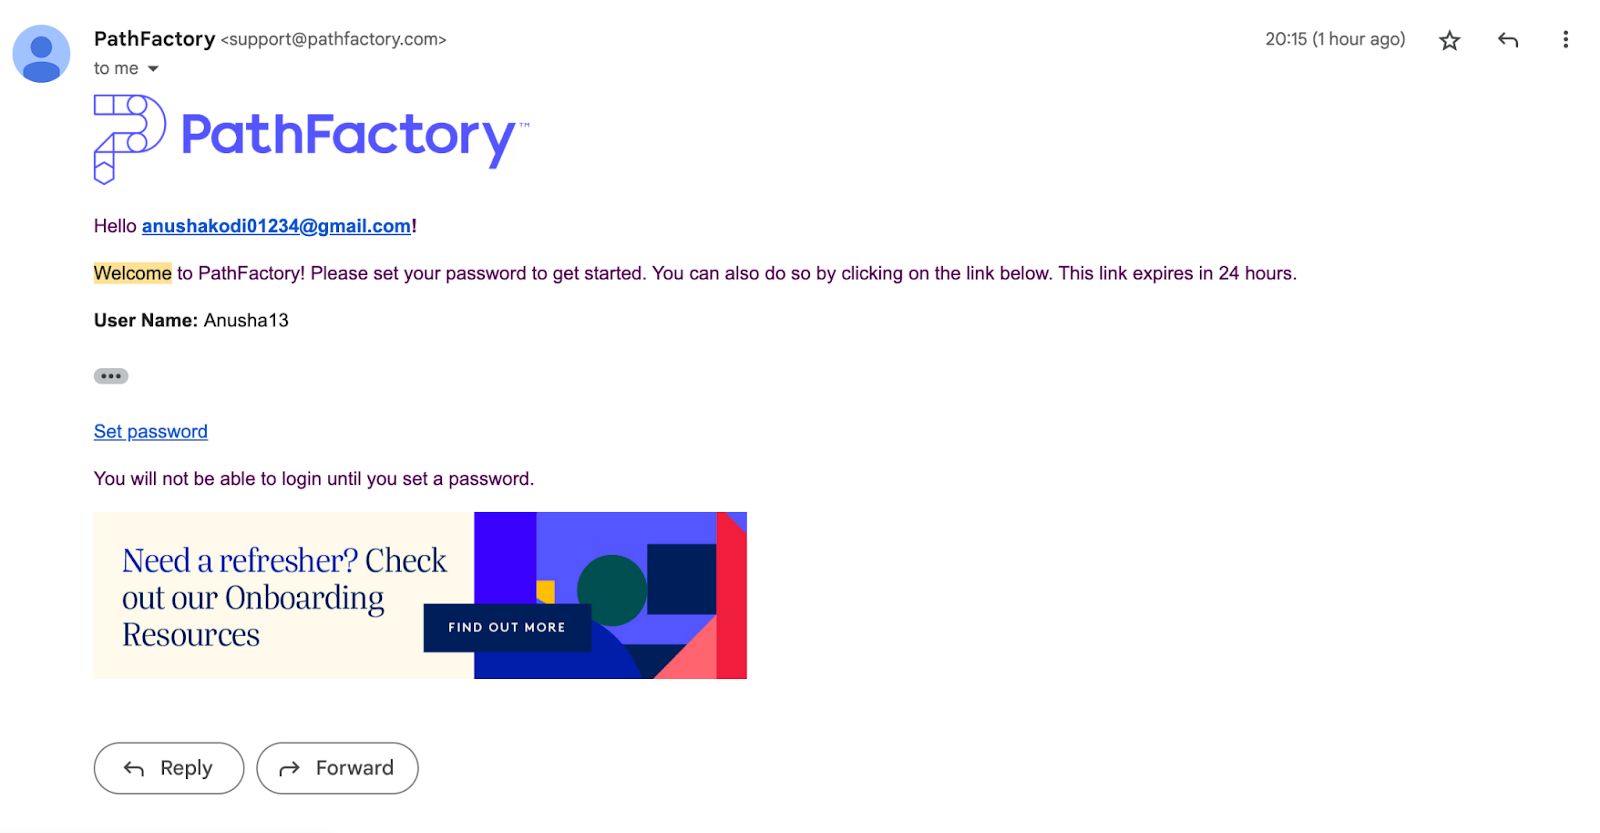
7. The users that have Yes value in the Active field for the CSV upload receive the following email.
The same Bulk Upload functionality can also be used to perform bulk update of the given attributes for the given user. Follow the steps 1-6 to update the attributes.
Note: All the available fields except for Email can be updated. Existing active users will not receive set password email as seen in step 7.
Tracking for Microsite and Virtual Events via unique Experience ID
Previously, there were unique IDs for Target and Recommend tracks only. With this release, you will be able to see the unique identifier of your Virtual Events and Microsites in the experience setup page. This will help you ensure alignment of unique ID data points that you are seeing across PathFactory, MAPs and CRMs. To see this functionality in action, follow these steps.
- On the main menu bar, click Content Activation, and then select Virtual Events.

2. From the list of Virtual Events that appears, select one of them.
3. On the resulting screen, you can see the automatically generated Event Experience ID associated with that Virtual Event.

You can also see the Microsite Experience ID for Microsites as well.

These IDs help you keep track of the data points you are seeing across your MAP for the given experience created in PathFactory. Click the Analytics tab to see tracking results.
Maintain filter values in your Scheduled Reports
Previously, when you opened your reports, the filter values that you had set previously were not persisting, and instead had reset to their default values. This release lets you see the set of filter values that were defined for your scheduled reports. When you click on the reports available under the scheduled reports area of the platform, you can see the filters displayed on the dashboards.
- On the main menu bar, select Path Analytics, and then click Scheduled Reports.

2. Select a report from the list that appears. You will see the filters along with the pre-populated values defined at the time the reports were scheduled. To change them, click the arrow beside Filters and update the values for the given field.

Views: 60